Discover the best vintage Christmas decor ideas to inspire your holiday season! Explore thrift store treasures and timeless Christmas decorations for a nostalgic Christmas time.
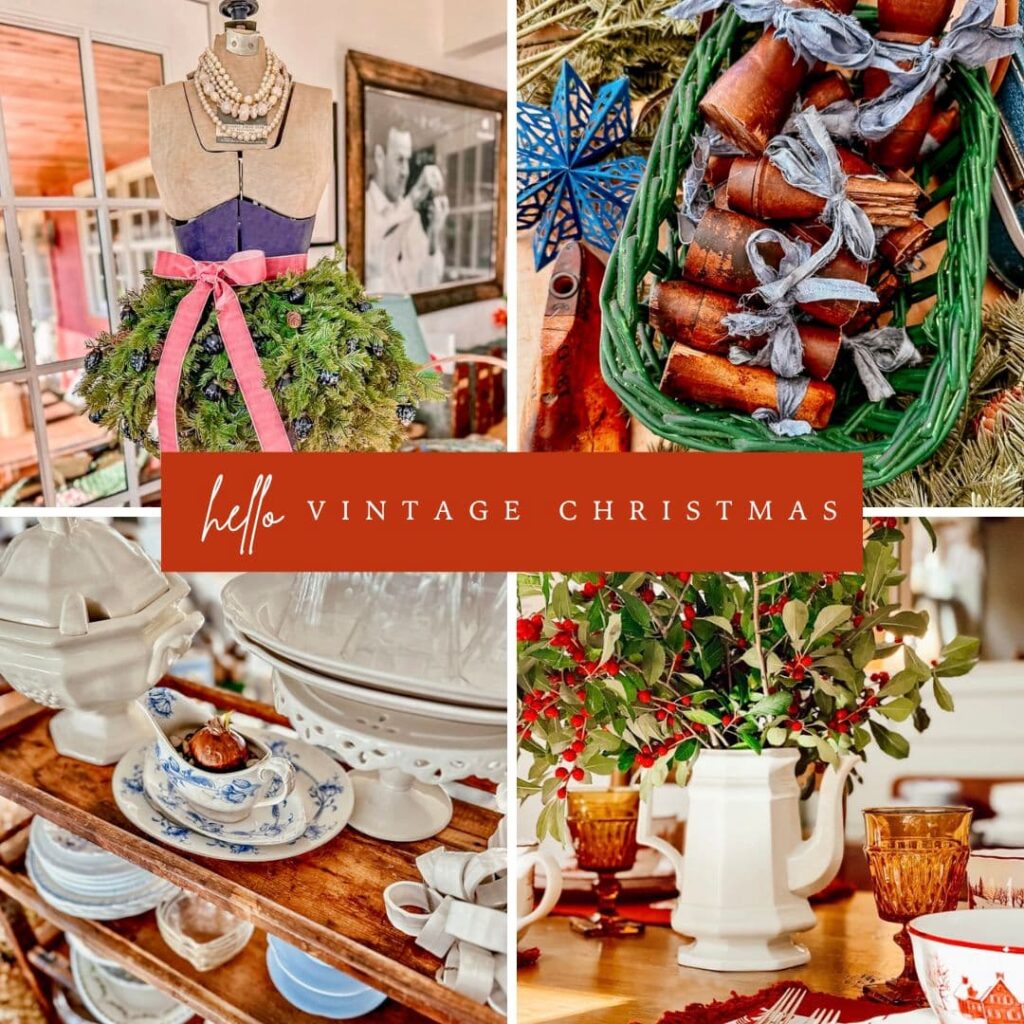
Old World Christmas Magic
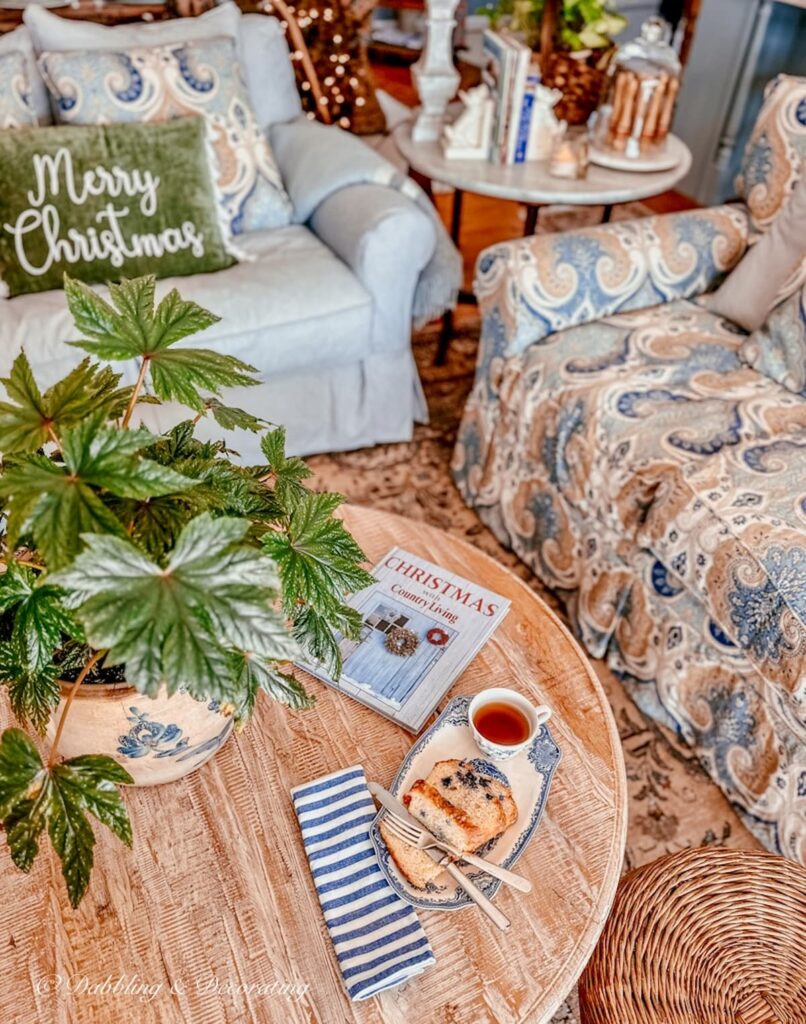
Decorating for a vintage Christmas is a celebration of nostalgia and timeless beauty.
Vintage decorations, with their intricate details and handcrafted designs, have an old-world charm that brings a sense of warmth and history to the holiday season.
Each piece, whether a retro ornament from a flea market or a cherished family heirloom, tells a story of Christmases past, connecting us to simpler times.
The unique patina, faded hues, and classic patterns create a cozy, endearing atmosphere that modern decorations often lack.
Embracing vintage Christmas decor allows you to infuse your home with personality, history, and a one-of-a-kind holiday magic that feels both authentic and enchanting.

Vintage Christmas Home Tour Blog Hop
If you are seeking vintage Christmas inspiration, you’ve come to the perfect place. Sit back, enjoy a cup of your favorite holiday cheer, and explore a collection of stunning vintage Christmas home tours all designed to spark creativity and elevate your holiday season.
17 fabulous vintage enthusiasts are sharing all of their Christmas home’s at the bottom of this post, hosted by my friend, Cindy of County Road 407.
If you are joining me from Cindy of DIY Beautify, welcome! Isn’t Cindy’s Christmas home tour just magical? All that time Cindy spent with us Thrifting with the Gals this past year as a guest host really paid off with all her beautiful vintage Christmas finds!
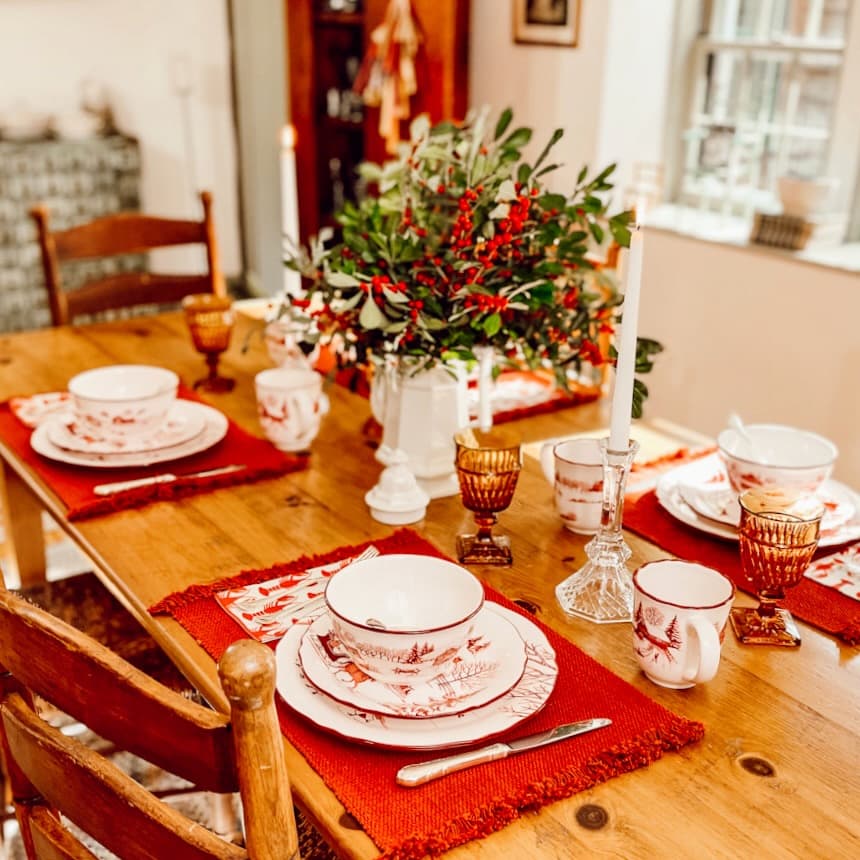
Vintage Christmas Traditions: 3 Holiday Wreaths
Starting or embracing family traditions with vintage Christmas decor adds a heartfelt touch to the holiday season. Incorporating vintage elements, like holiday wreaths, into your traditions brings a sense of continuity and charm that makes the season even more meaningful and reflective.
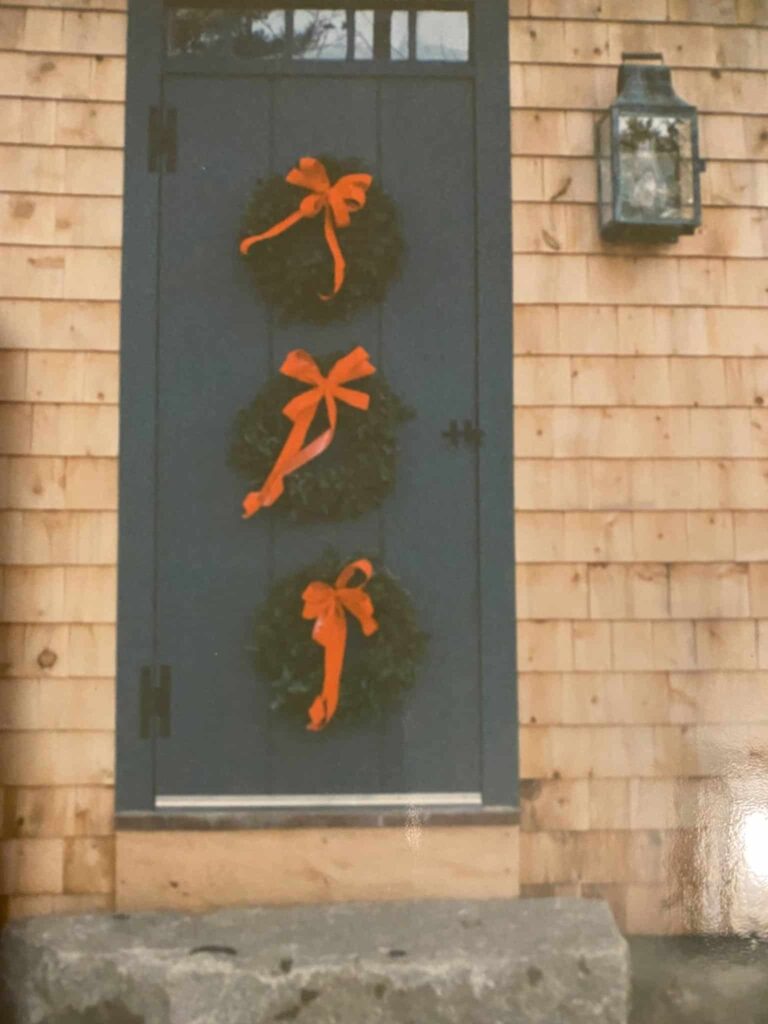
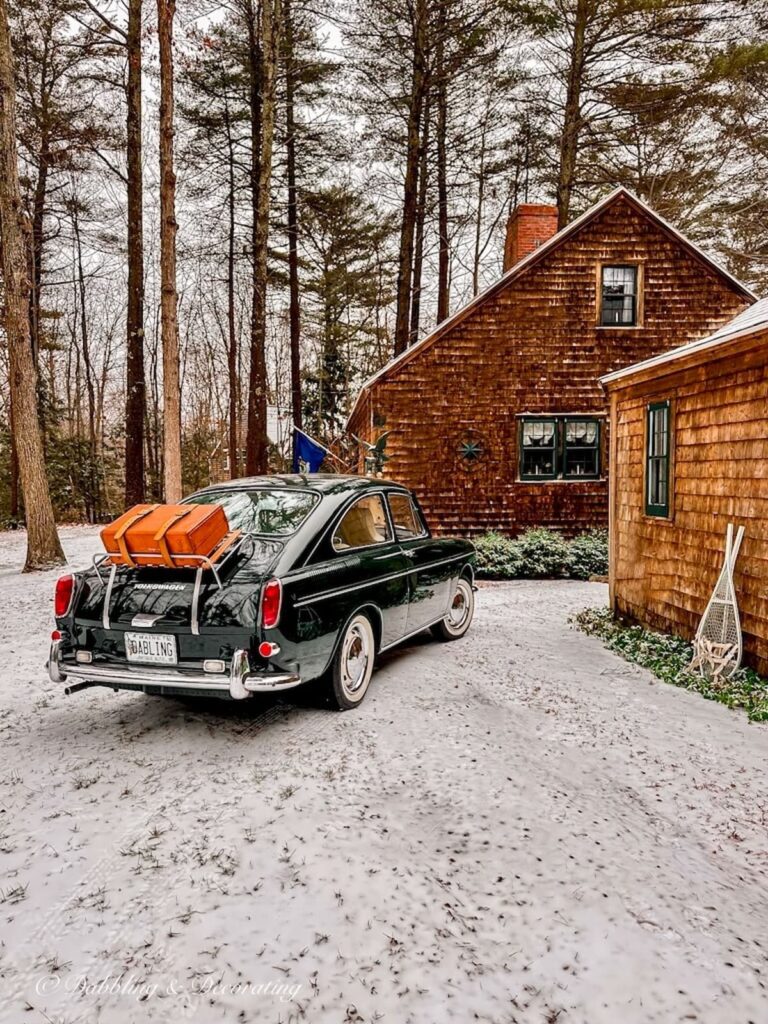
Six years ago, we inherited my parents’ home in coastal Maine. While going through some old photos, I found this picture of their 1930s front door decorated with three small wreaths.
The photo was taken the first year my parents built this home, a replica of an early American home called a Raeside & Dame, which is popular today on the New England seacoast.
At that time, my folks were in their 70s…
A Touch of Nostalgia
I loved it so much that I was inspired to start a new family tradition. Each holiday season, I will hang three evergreen Christmas wreaths on this antique front door just like my mother did, a tradition that today represents revitalization and rejuvenation.
 30 Year’s Ago
 Year 1
- Year 2
 Year 3
- Year 6
 Year 5
- Year 4
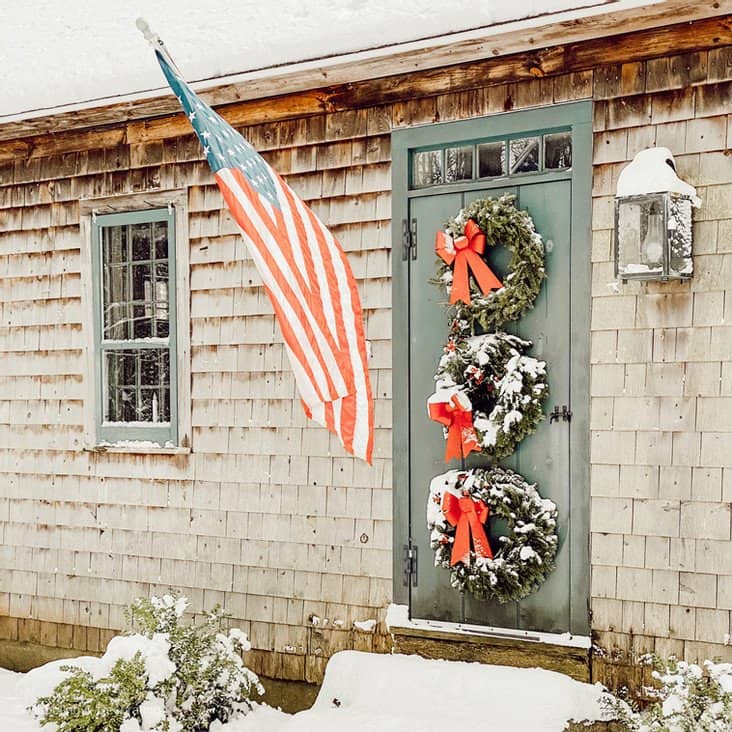
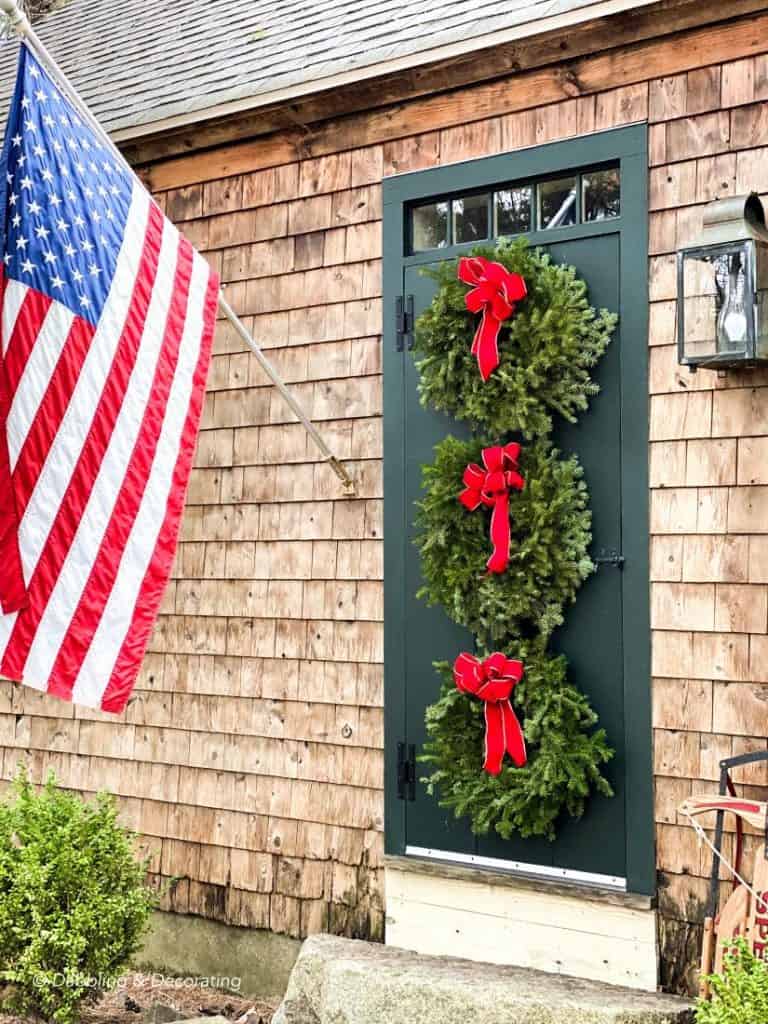
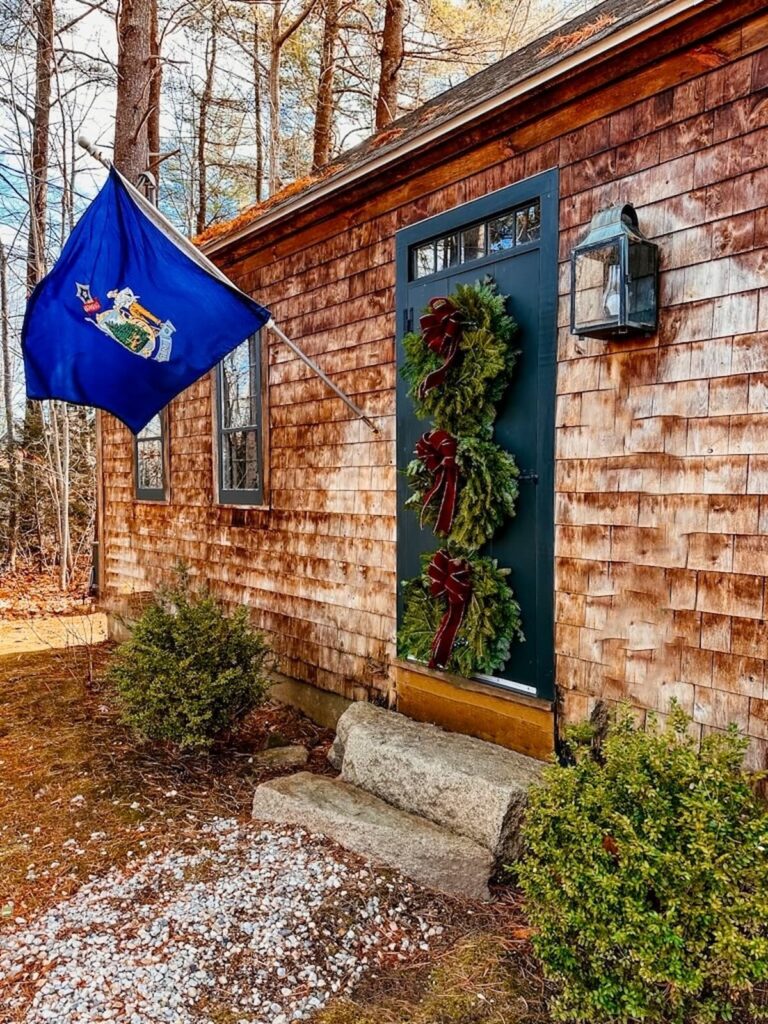
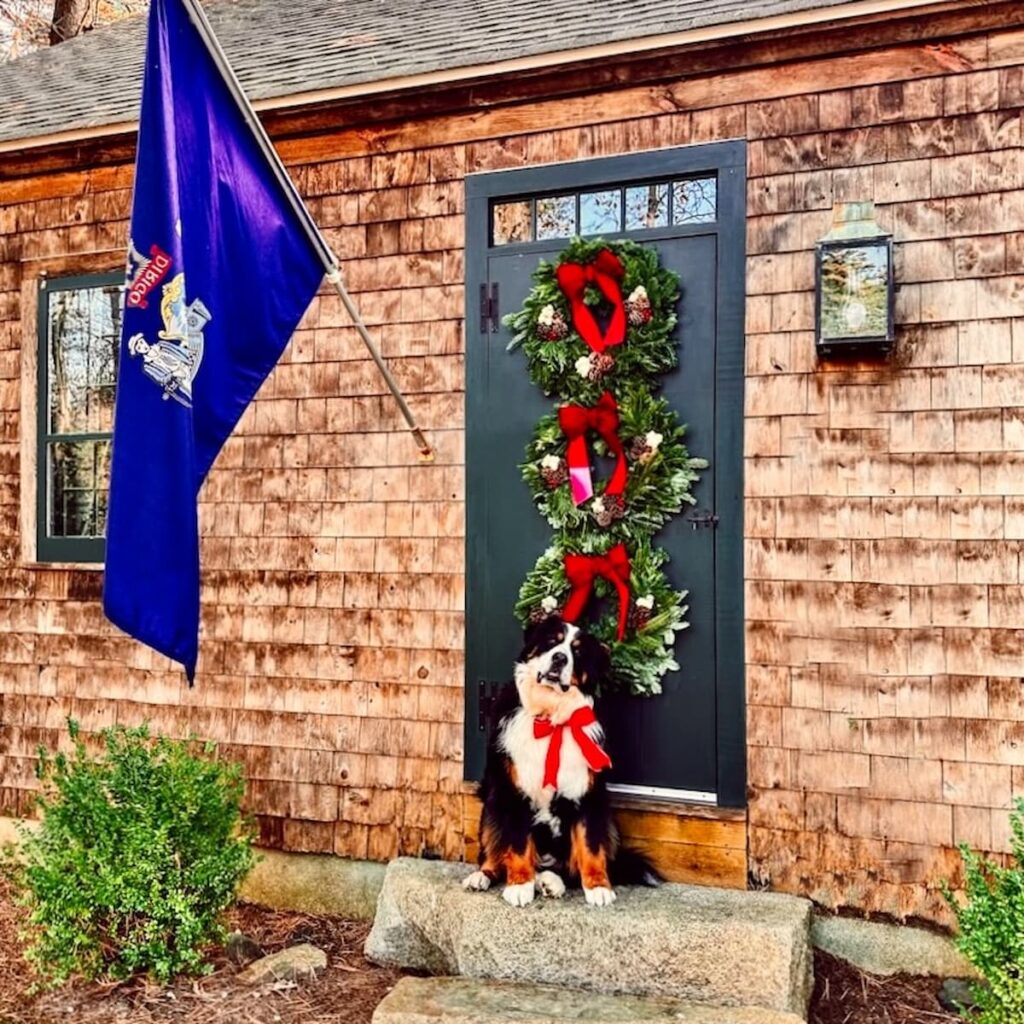
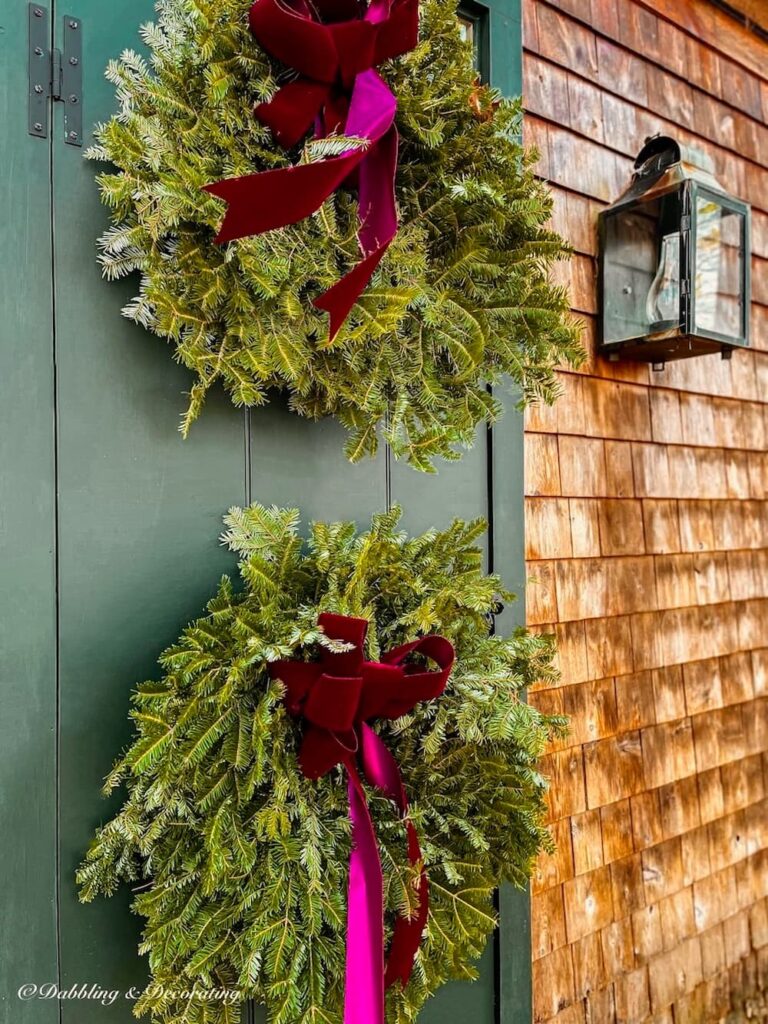
Learn more in this 3 Wreath Christmas Tradition On A 1930s Front Door post. This year I bought my three wreaths from Chase Farms in Wells, Maine. Each wreath is adorned with a burgundy bow, and faux Maine blueberries surround the evergreens.
Which year is your favorite?
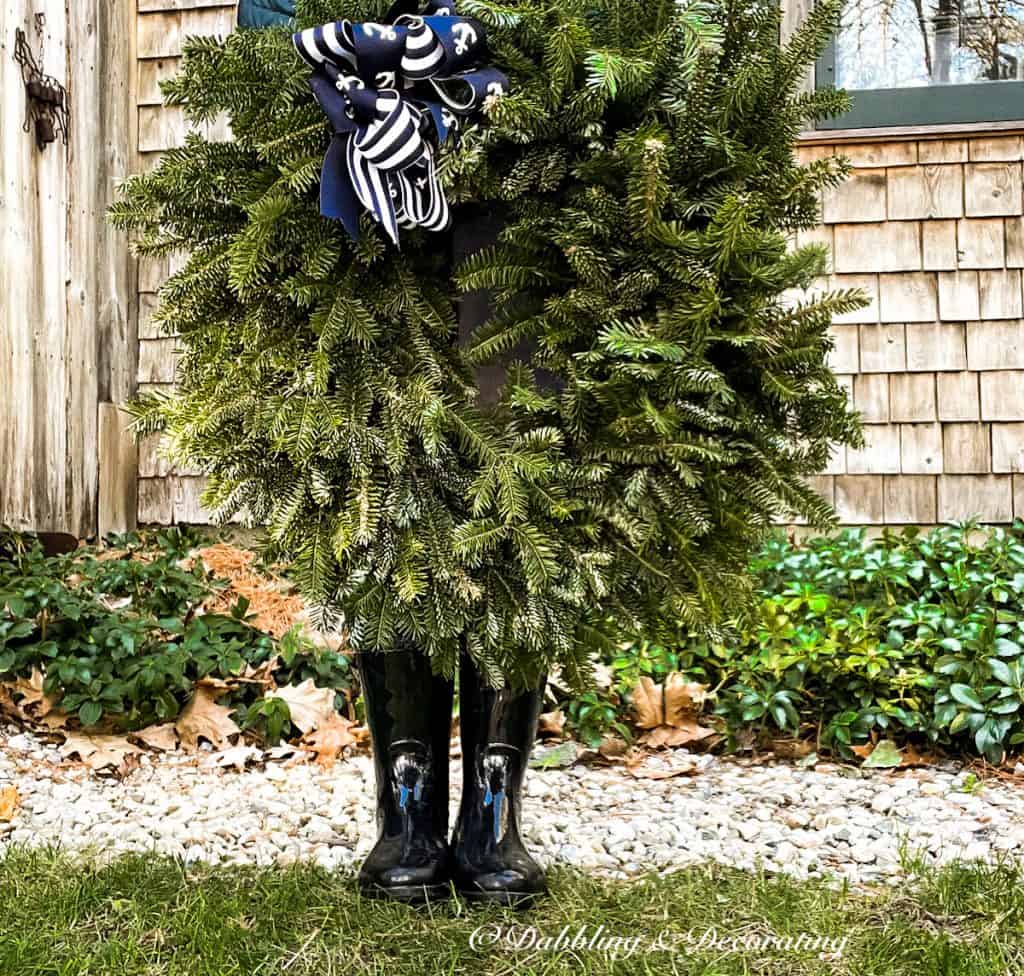
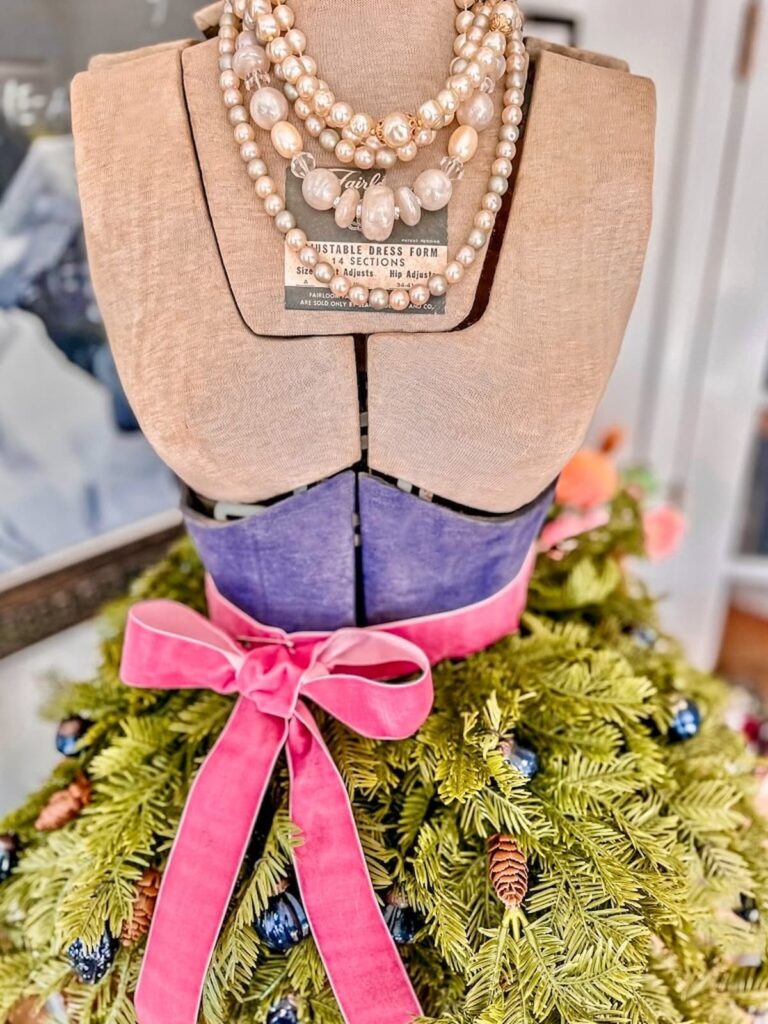
Vintage Christmas Tree Mannequin
Bring festive charm to your holiday decor this season with a thrifted vintage Christmas twist!
I have always wanted to style a vintage mannequin or bust form for the holiday season. And this is the year!
So far, this has been my favorite holiday addition, as we are still in the midst of holiday preparations.
This was so simple, and I’m sharing my easy tutorial in this How to Style a Tabletop Bust Form For Christmas post just for you.
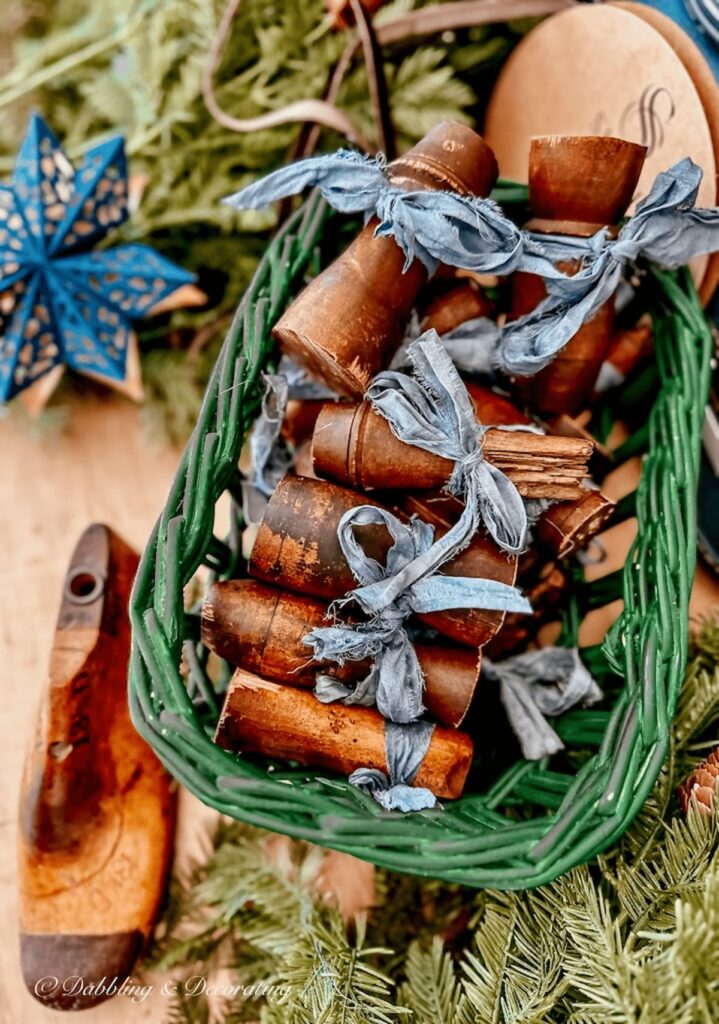
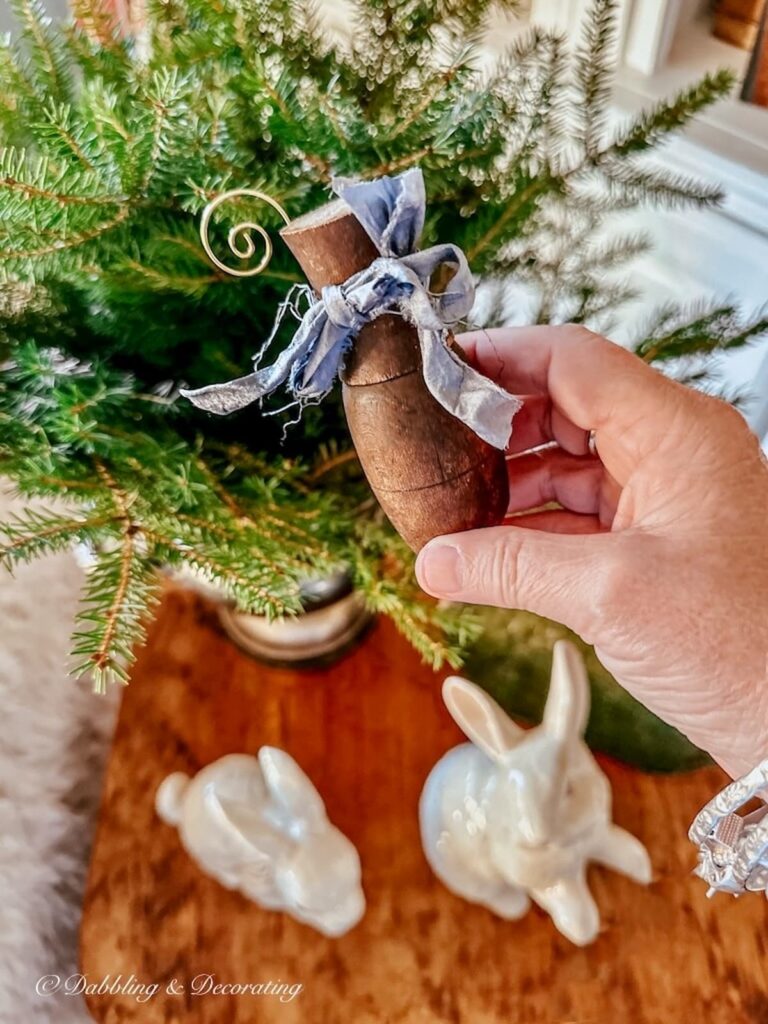
Vintage Christmas Ornaments Craft Ideas
Do you have some vintage wooden spindles hanging around? If not, check your local thrift stores and flea markets for a few of these treasures. Did you know they make beautiful vintage Christmas ornaments?
And if you like easy craft ideas, this one’s for you!
This 3 Decorative Wood Spindles Finials Holiday Craft Ideas post contains all the details.

Pro Tip
You may also find inspiration in this 50 Favorite Thrifted Decor Ideas From Paris to New England post.
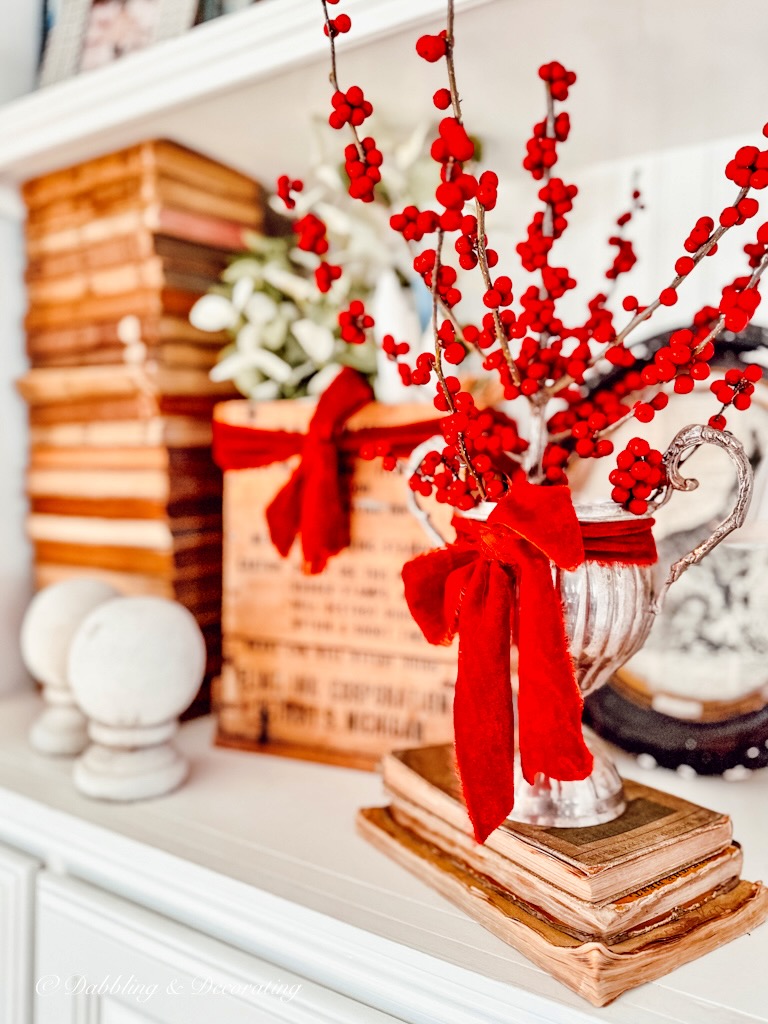
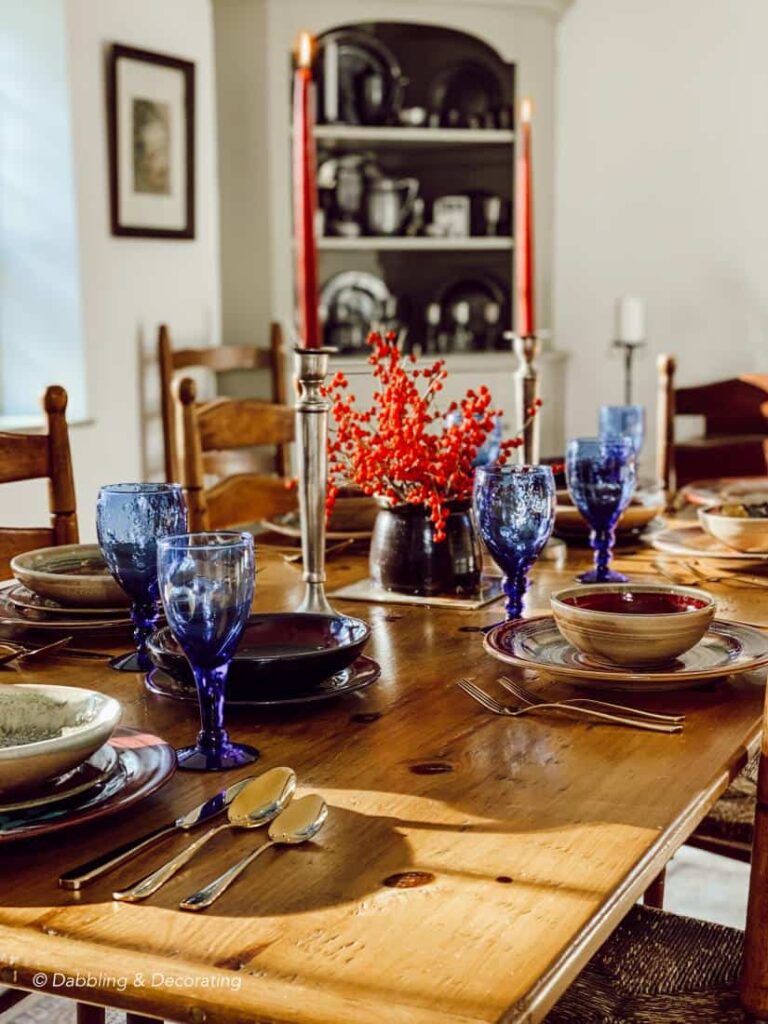
Natural Elements in Vintage Finds
Decorating for a vintage Christmas is a fun way to bring timeless charm to your home during the Christmas season.
Combining vintage pieces with natural elements like winterberries and paperwhites allows you to create retro Christmas decorations that feel both festive and unique.
These thoughtful touches add warmth and texture, transforming your vintage finds into stunning focal points full of vintage charm.
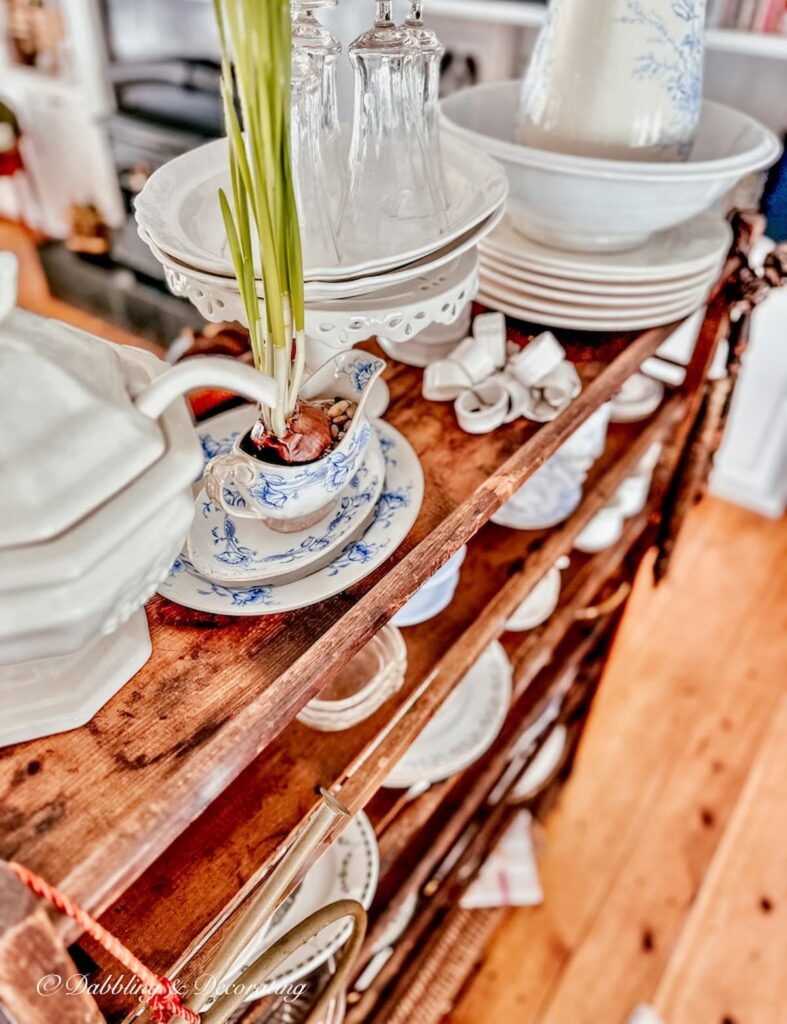
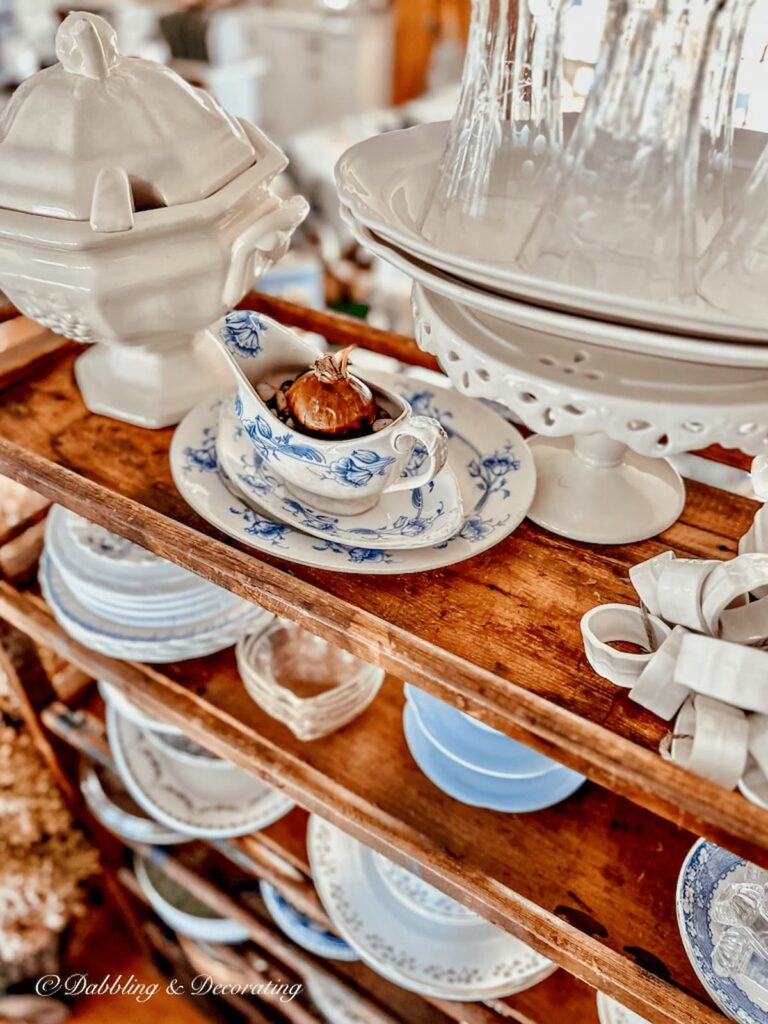
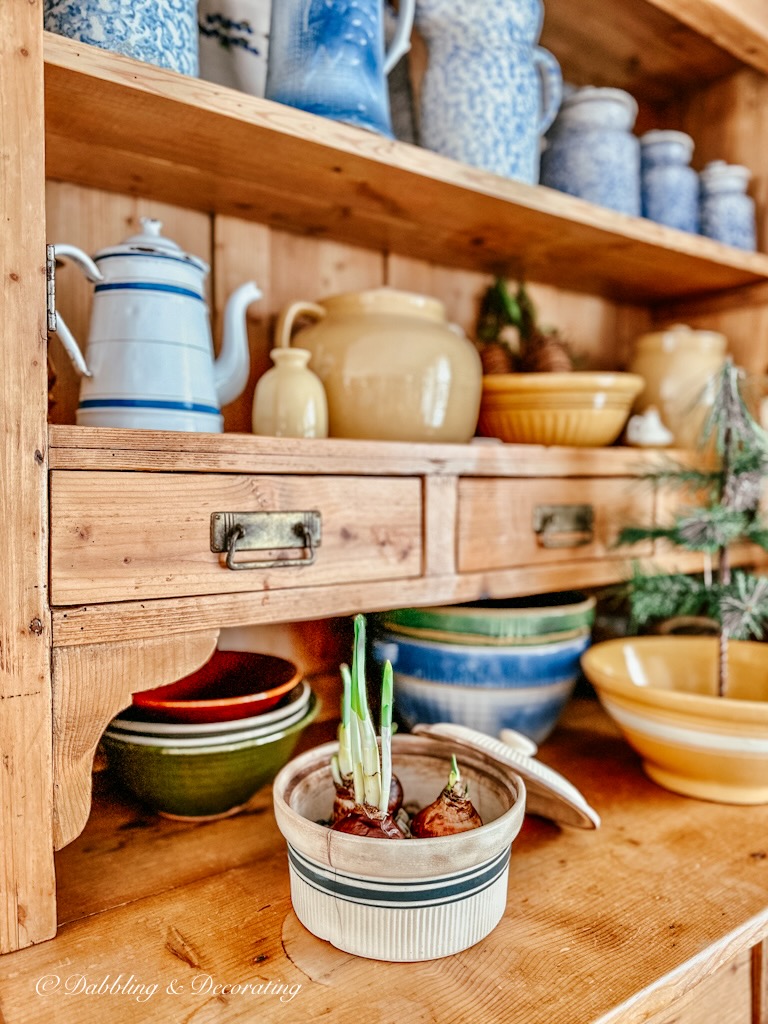
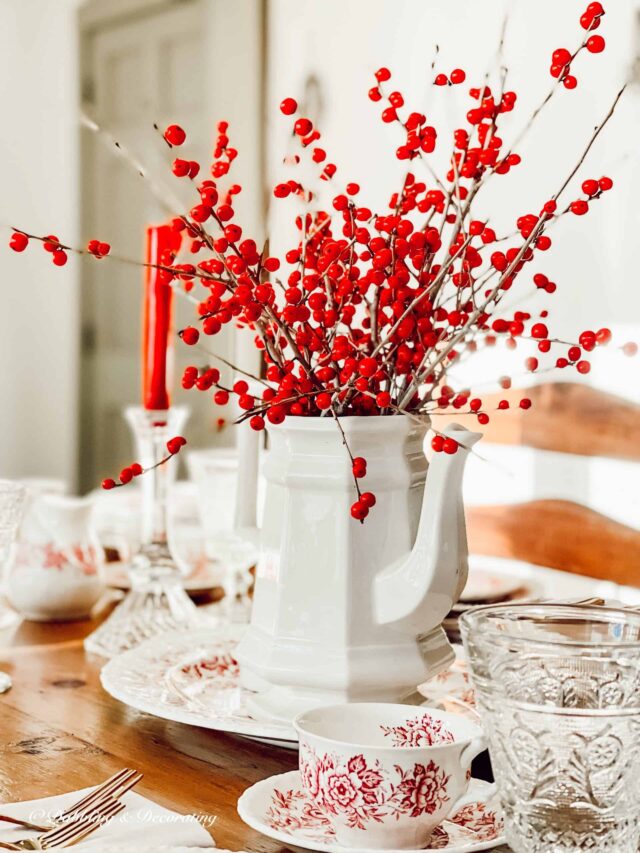
Adding natural elements to vintage kitchenware, such as old gravy boats, bowls, teacups, and stoneware, is a great way to bring a classic look to your home during winter.
Pro Tip
You may also find inspiration in this Grow Paperwhites for Saint Patrick’s Day post.
Filling these pieces with sprigs of greenery, pinecones, or seasonal blooms adds a personal touch and highlights their timeless beauty.
Repurposing these cherished items is a great idea, creating displays that feel unique and heartfelt while infusing your home with warmth and character throughout the holiday season.
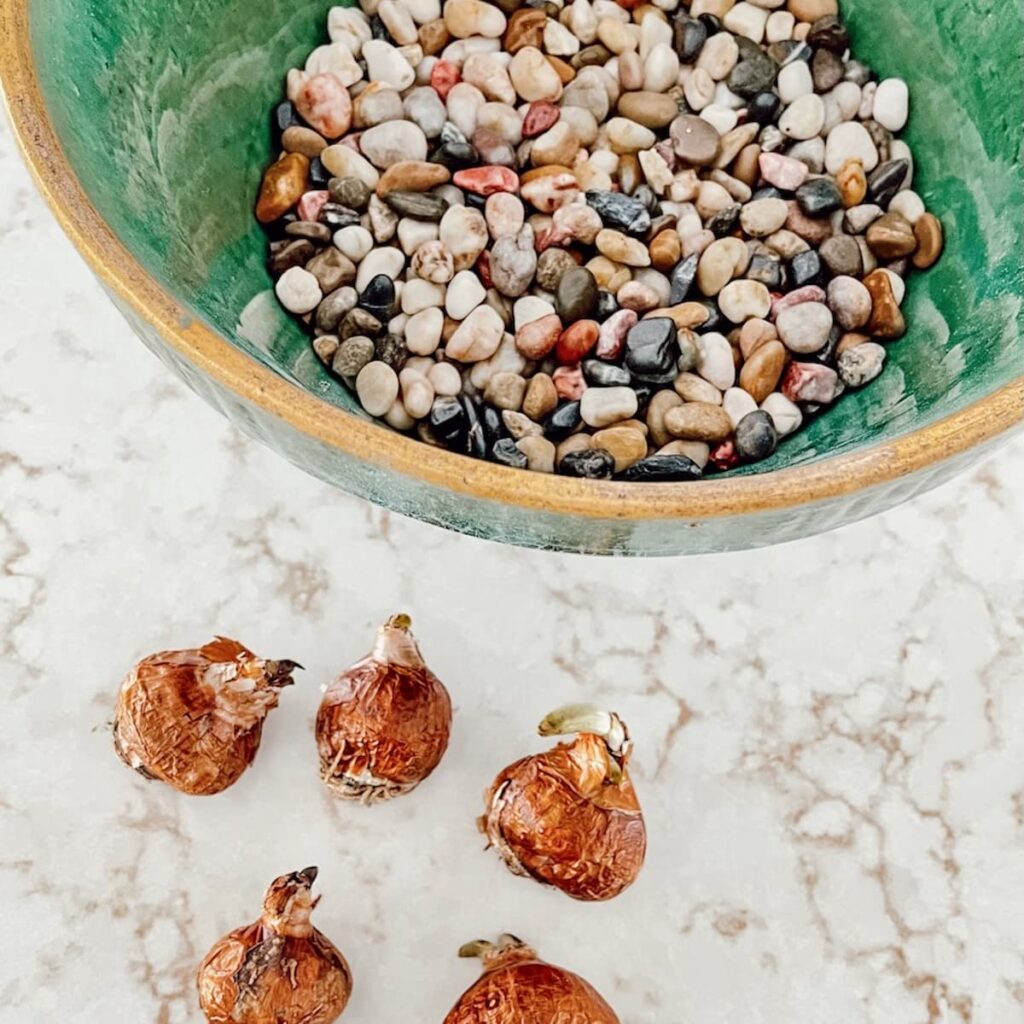
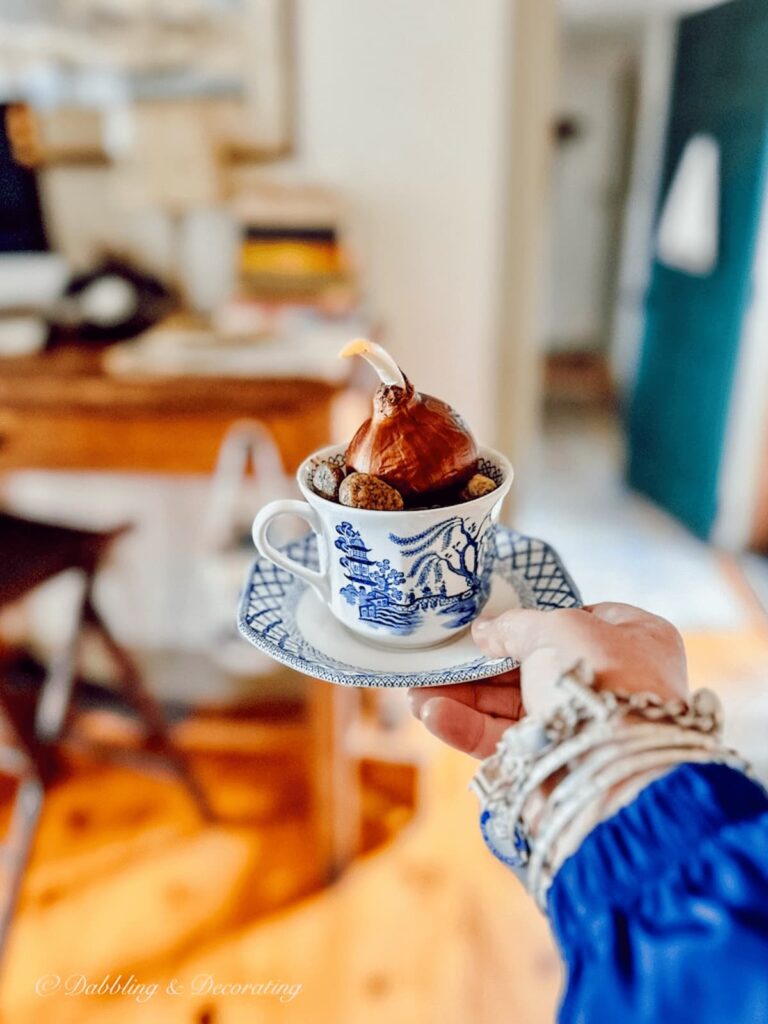
Paperwhites
Now is the time to plant your paperwhite bulbs so they are ready for Christmas. They take about 4-6 weeks to bloom. I planted my paperwhite bulbs in a vintage gravy bowl and antique stoneware that I found at flea markets.
Paperwhite bulbs planted in vintage pieces also make beautiful gifts.
This year, I planted a few paperwhite bulbs in a collection of blue and white vintage teacups and saucers that I had thrifted and gifted to a few of our neighbors and friends.
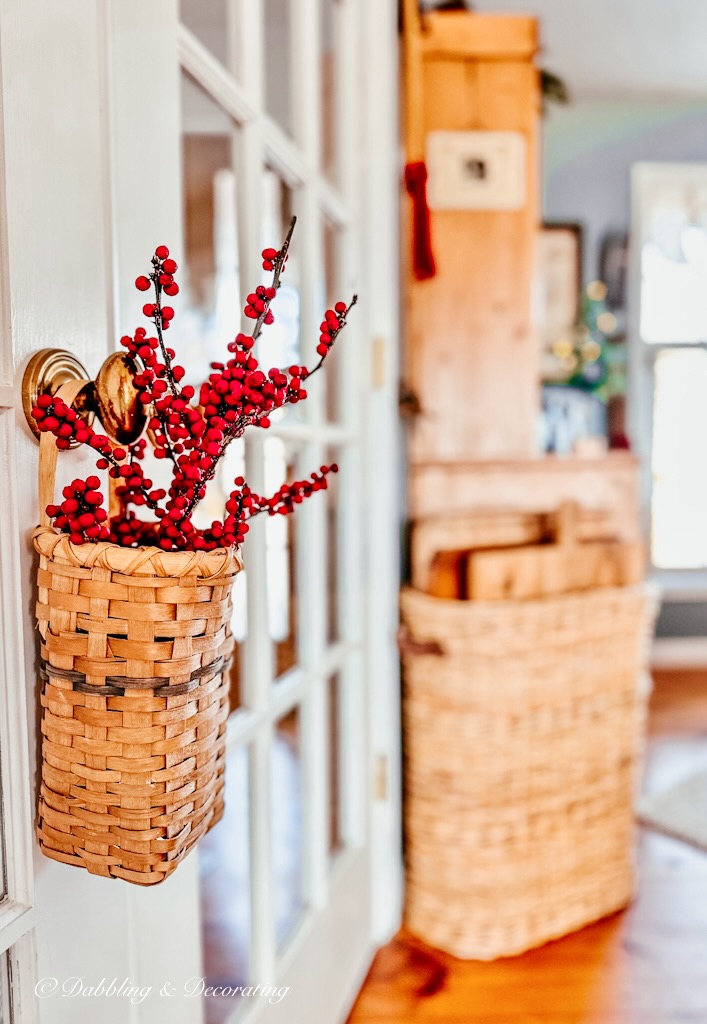
Winterberries
We are fortunate enough to have three winterberry bushes growing in our backyard. Their red berries are a favorite of mine to add to vintage pieces for a vintage Christmas at home.
A winterberry bush is a type of deciduous holly known for its vibrant display of red berries, which bring color to the winter landscape.
During the spring and summer, it features green leaves alongside clusters of red berries, but as the seasons shift, the foliage drops, leaving behind striking, bare branches adorned with bright red berries.
This seasonal transformation makes winterberry a favorite for holiday decor and winter arrangements.

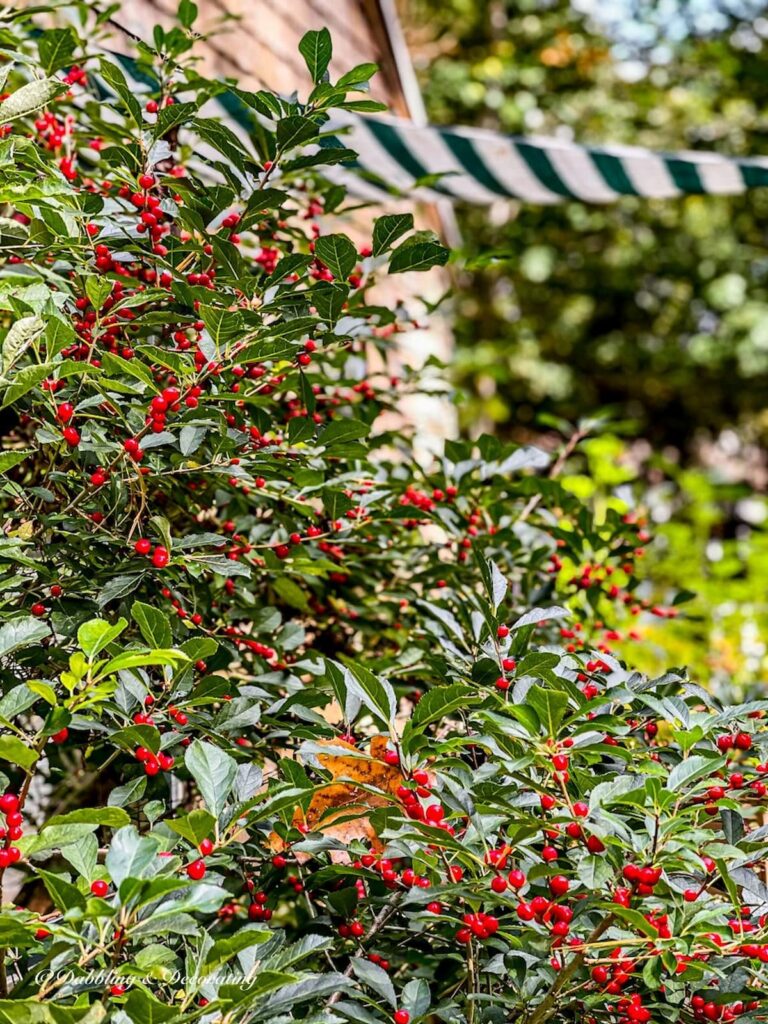
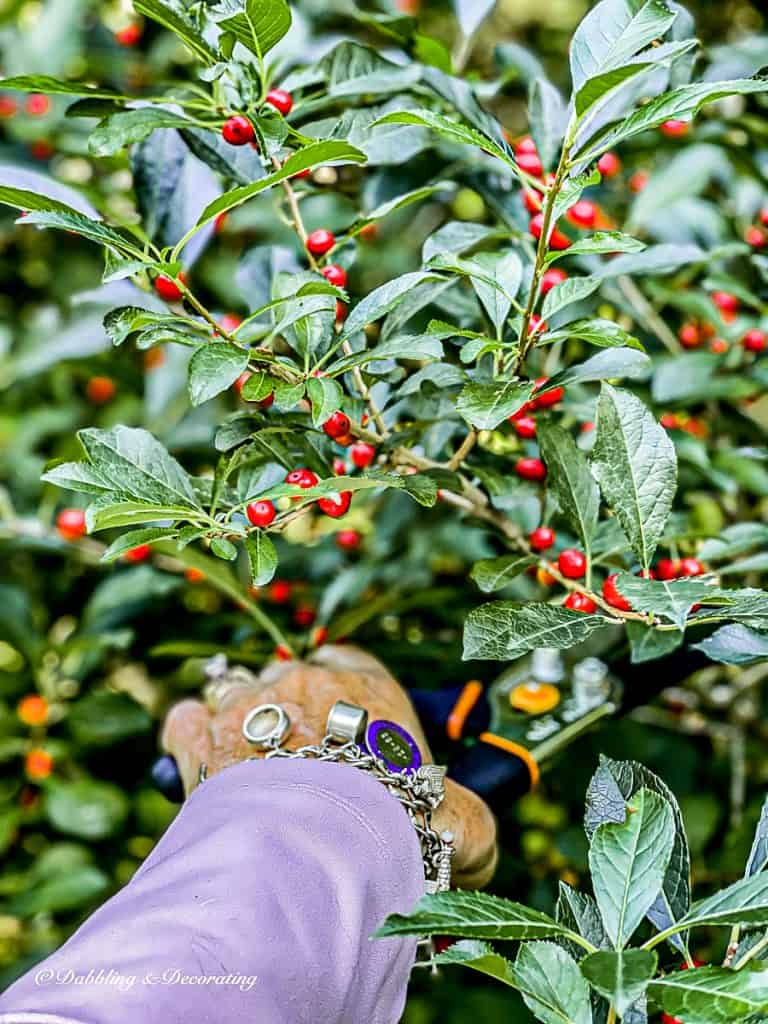
And they’re not just for Christmas.
I also use winterberries to warm our living spaces during the winter months. From centerpieces to a simple bundle of winterberry branches wrapped with a velvet bow, they make for charming holiday displays.
Pro Tip
You may also find inspiration in this 15+ Christmas and Holiday Thrift Store Makeovers post.
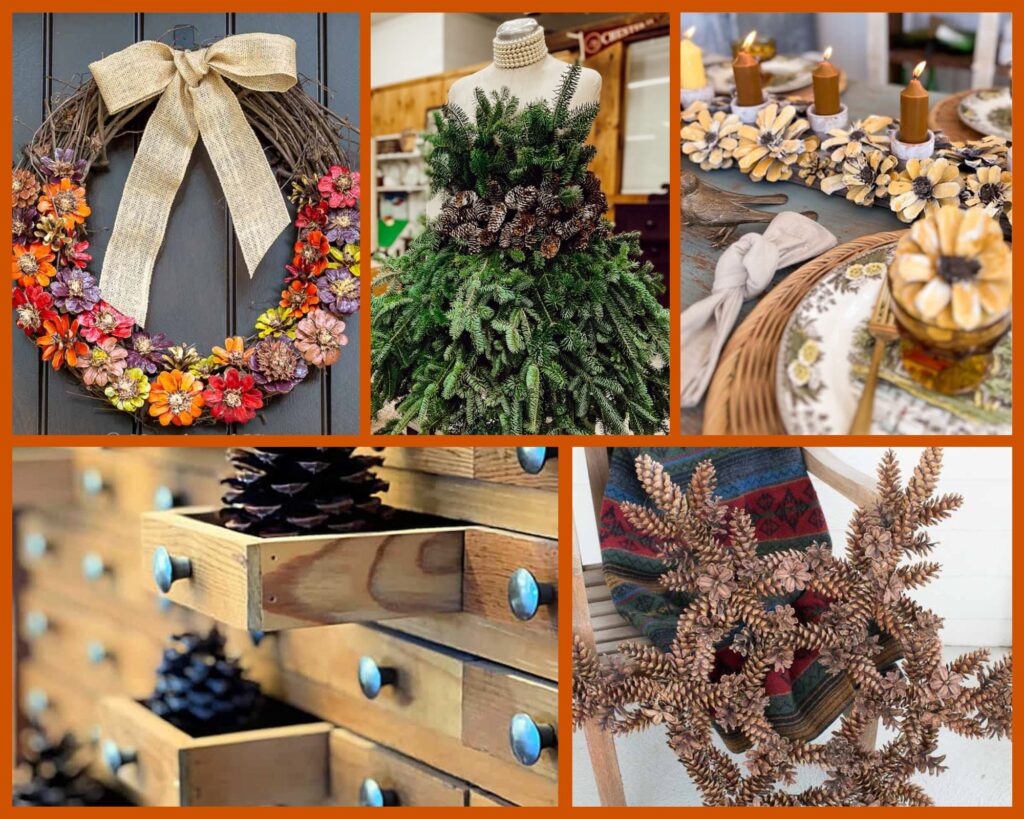
Pinecones
Pinecones are another favorite and easy natural element to use in vintage vessels for your vintage Christmas at home!
I created a blog post all about decorating with pinecones, which you can find in this 50 Festive Pinecone Decor, Crafts & DIY Decorations post.
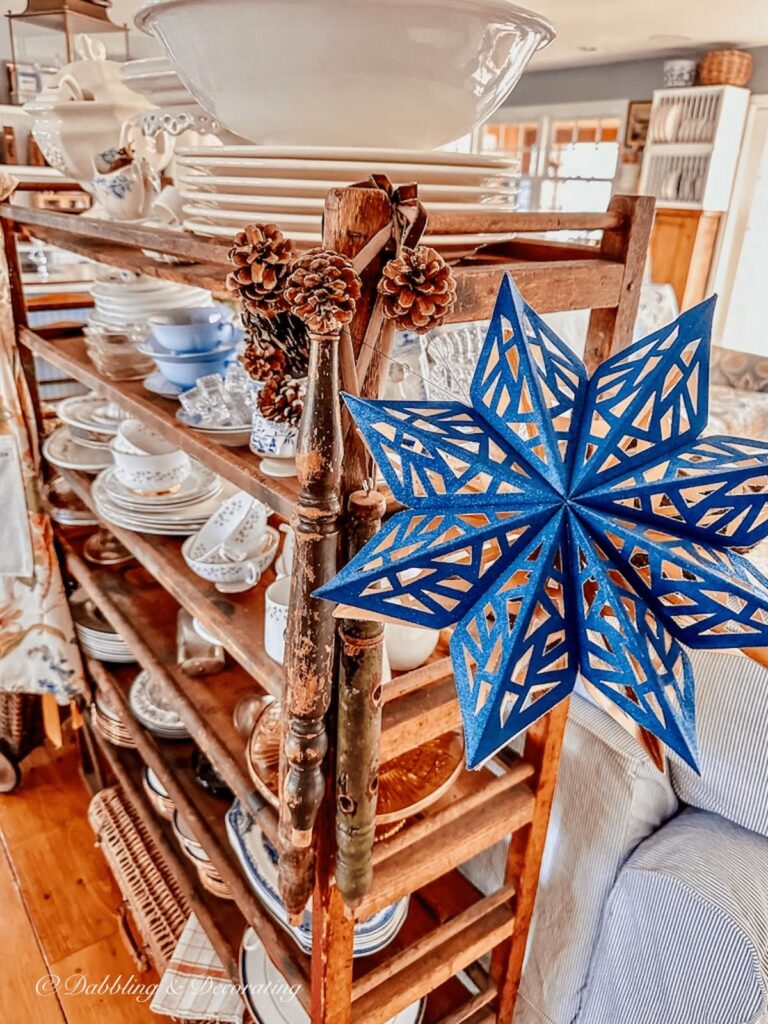
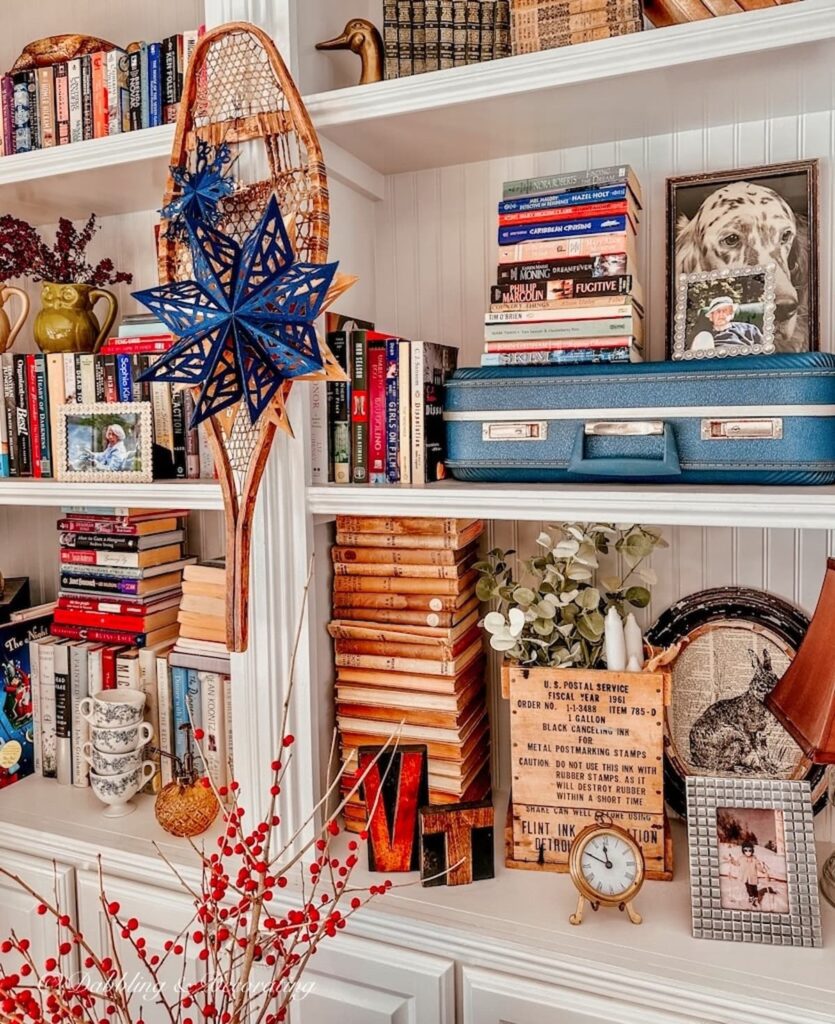
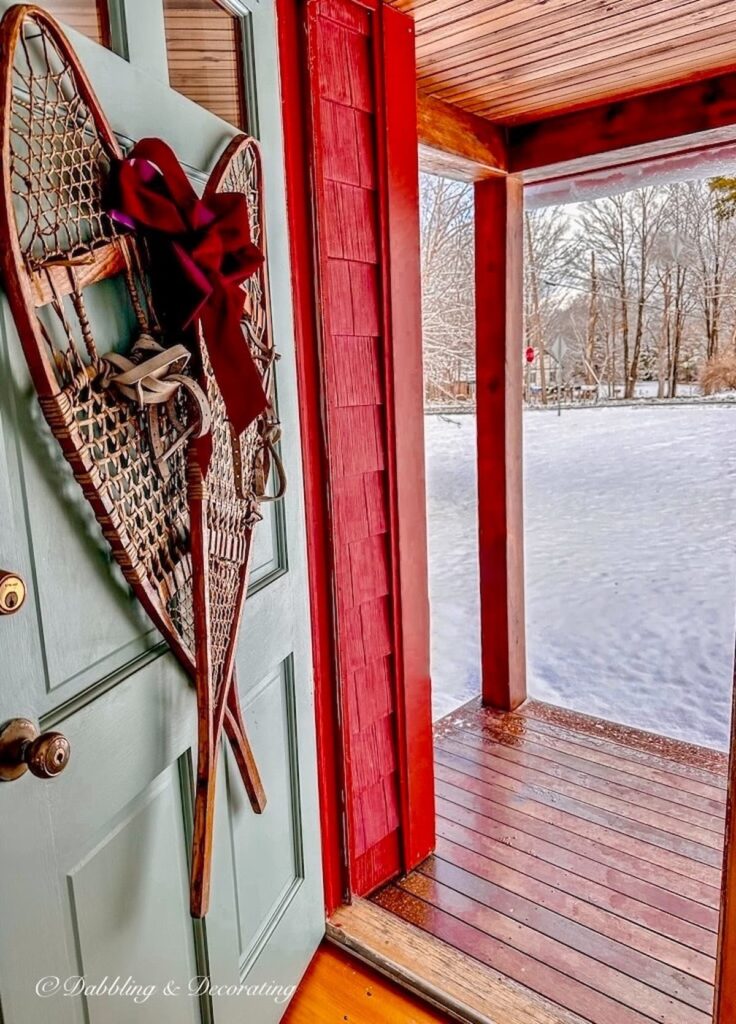
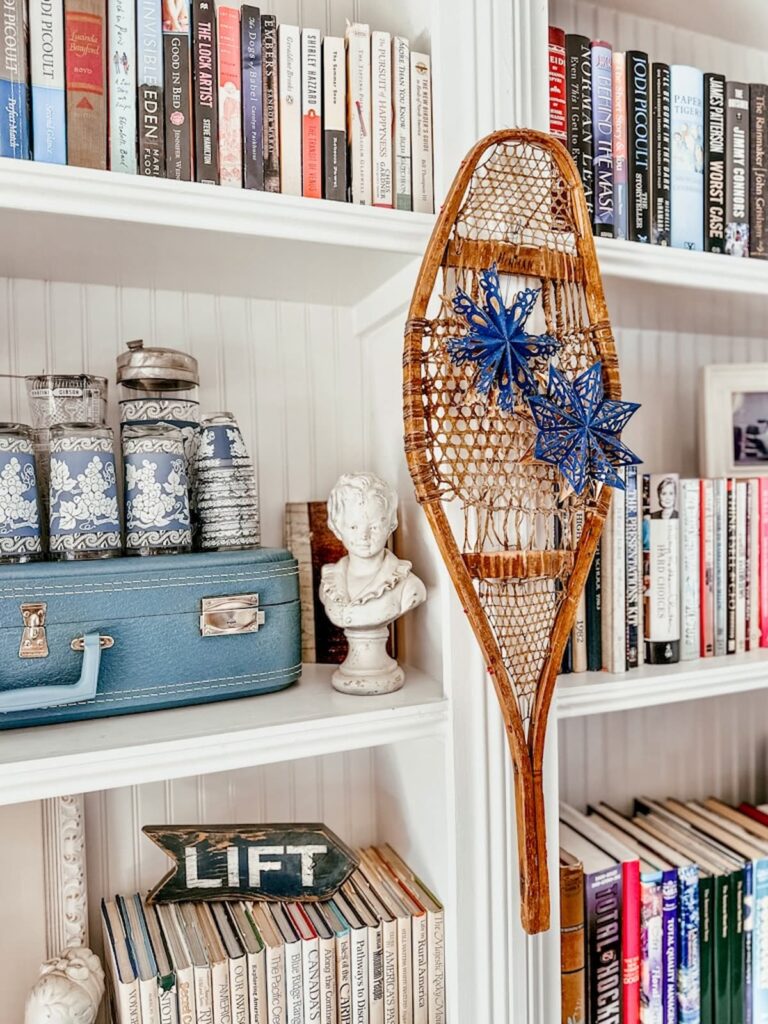
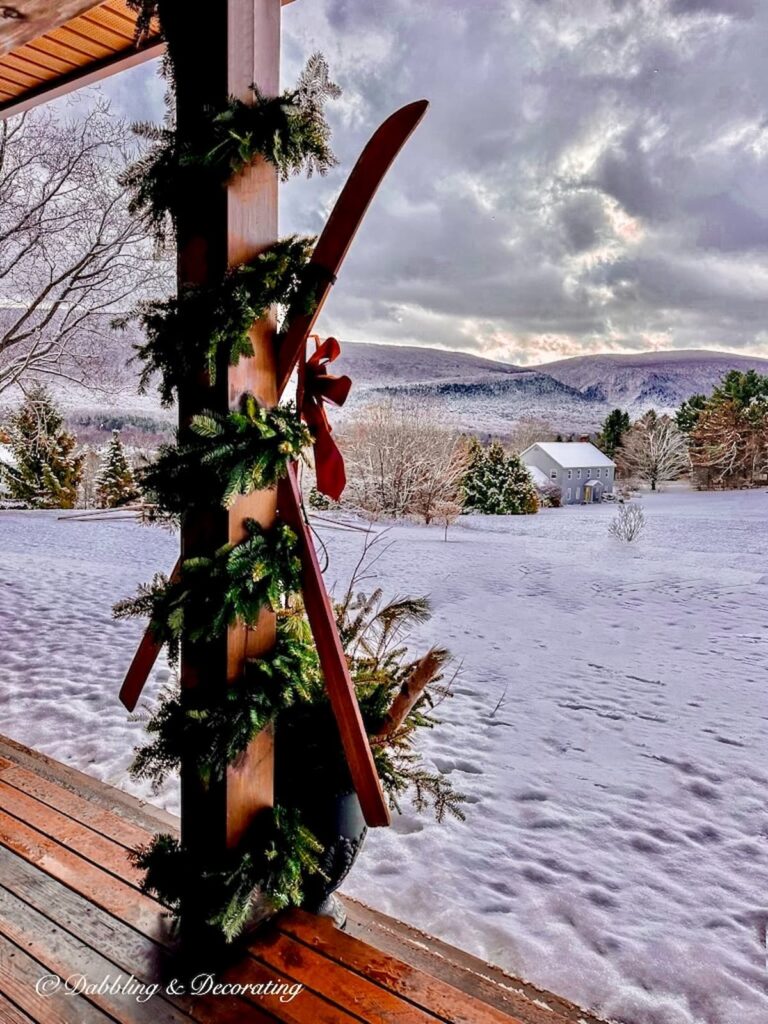
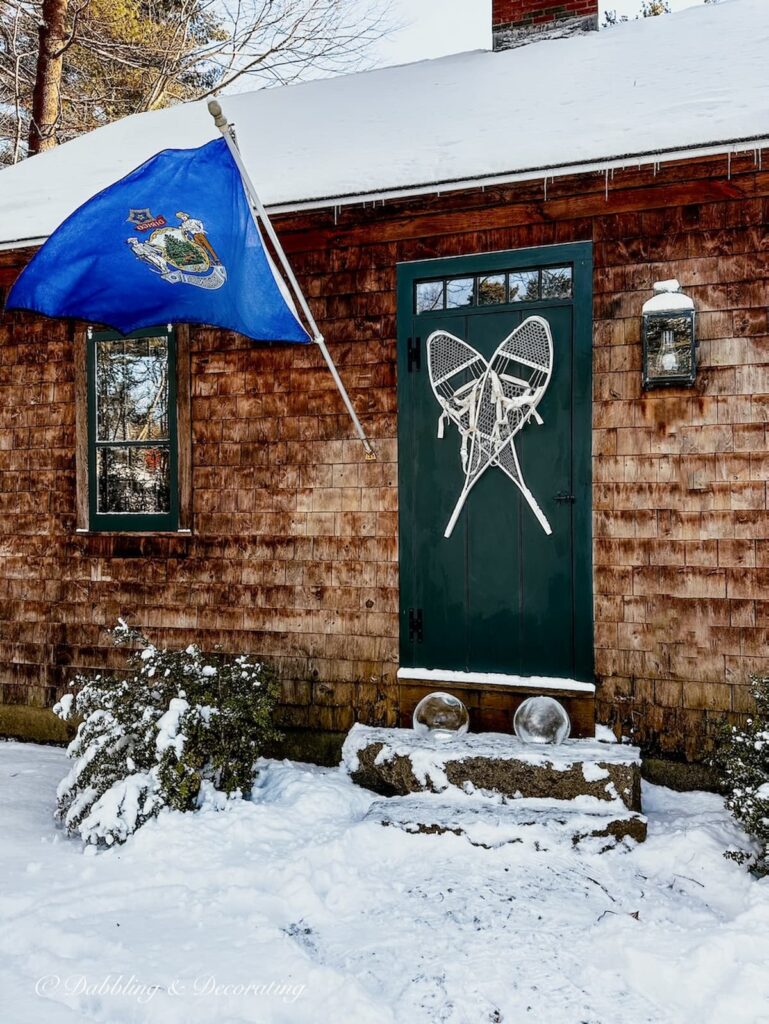
Vintage Christmas Snowshoes
One of my favorite holiday Christmas decor pieces is vintage snowshoes, which I use for interior and exterior decor.
This year, I’ve hung one snowshoe on each side of our fireside built-in bookcases and layered them with blue snowflakes that I found from The Collected online.
Then, I crisscrossed two larger snowshoes onto our front door and attached a burgundy bow—my chosen outdoor seasonal color.

Find more vintage Christmas snowshoe ideas in these posts:
Pro Tip
You may find more vintage ski lodge decoration ideas in this Après Ski Theme Party Vintage-Inspired Host ideas Post.
Holiday Season Porch Preparations
I don’t think holiday preparations ever stop around here.
How about you?
Are you also constantly trimming, rearranging, and decorating for your vintage Christmas?
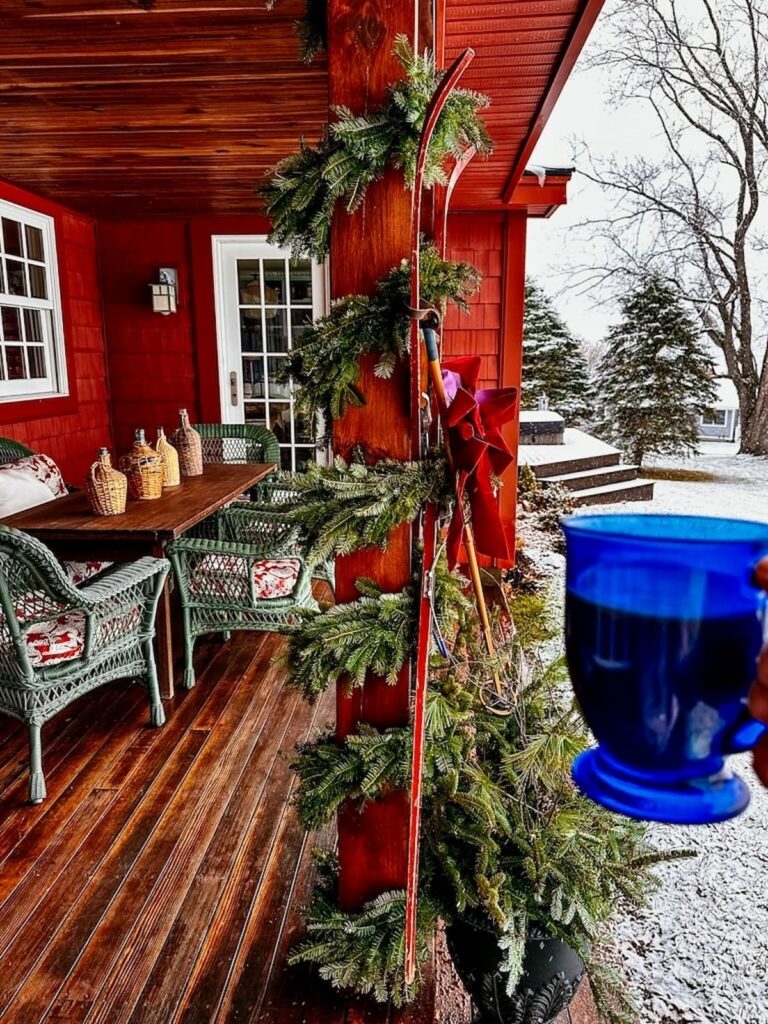
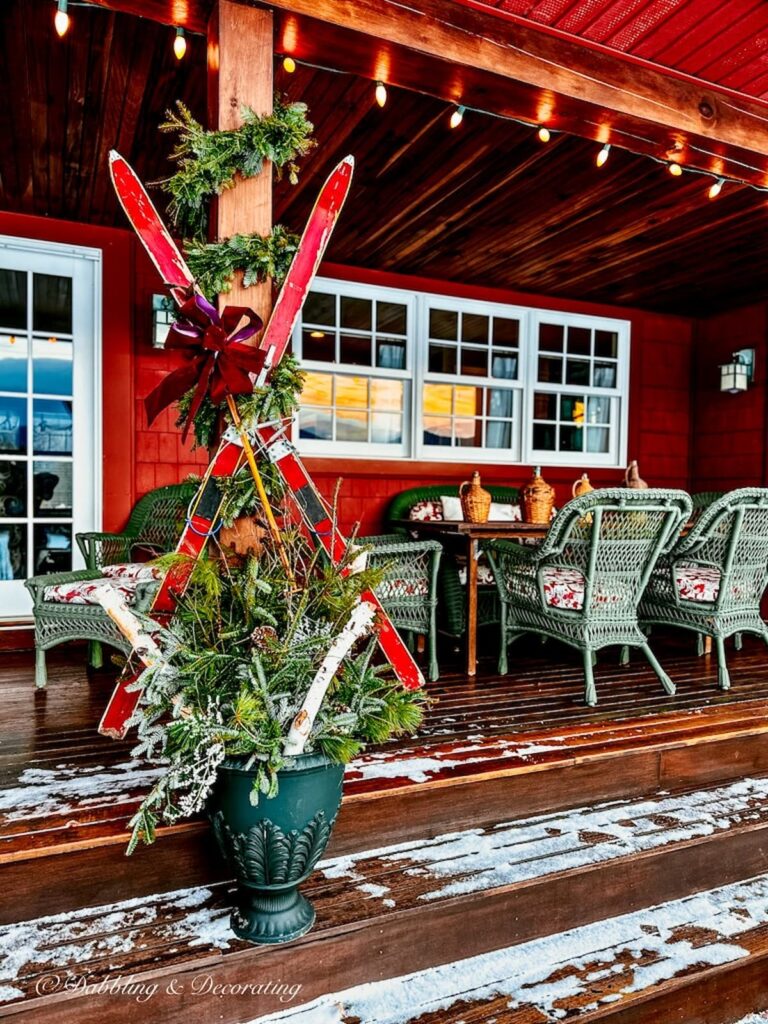
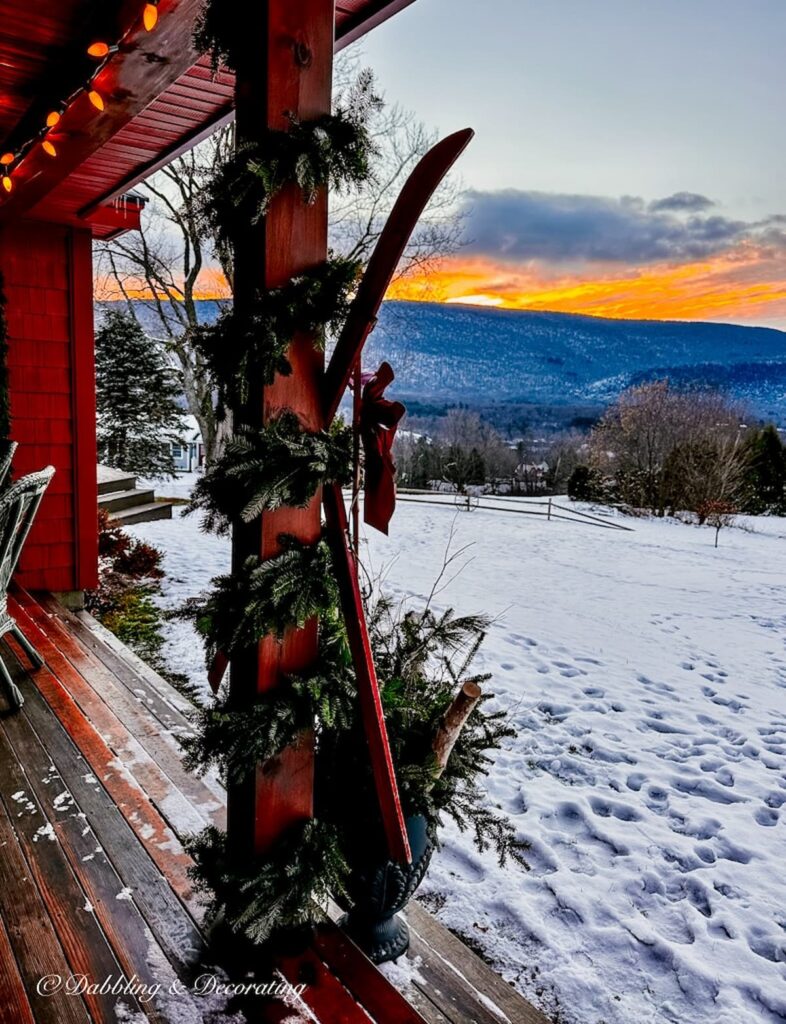
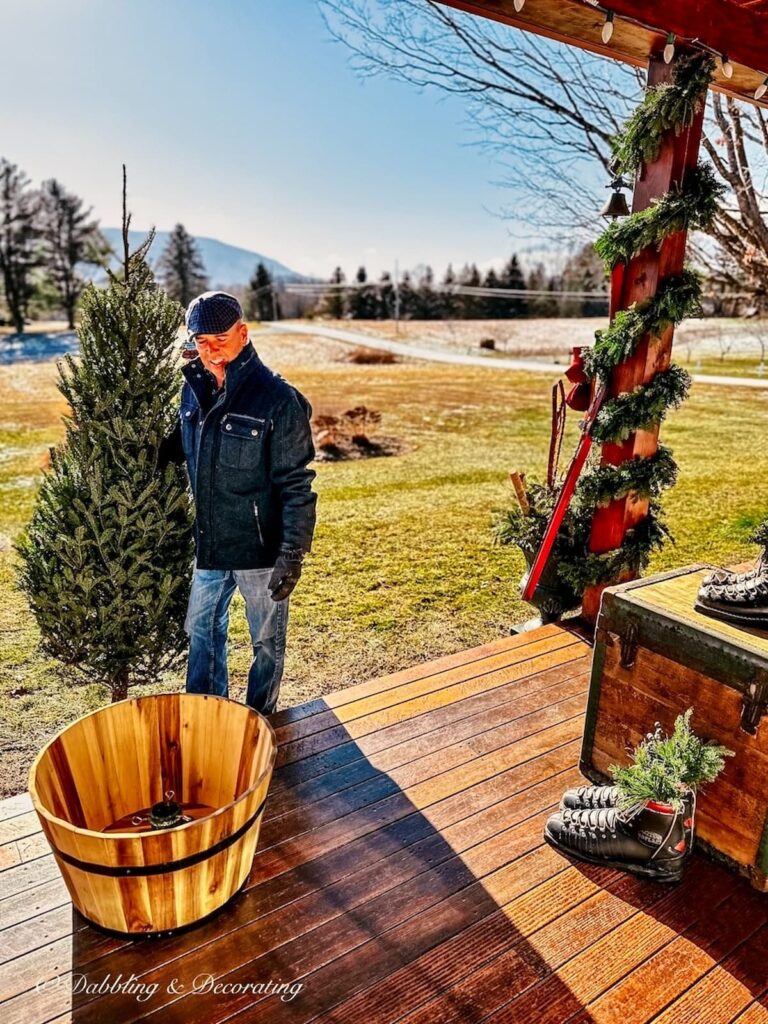
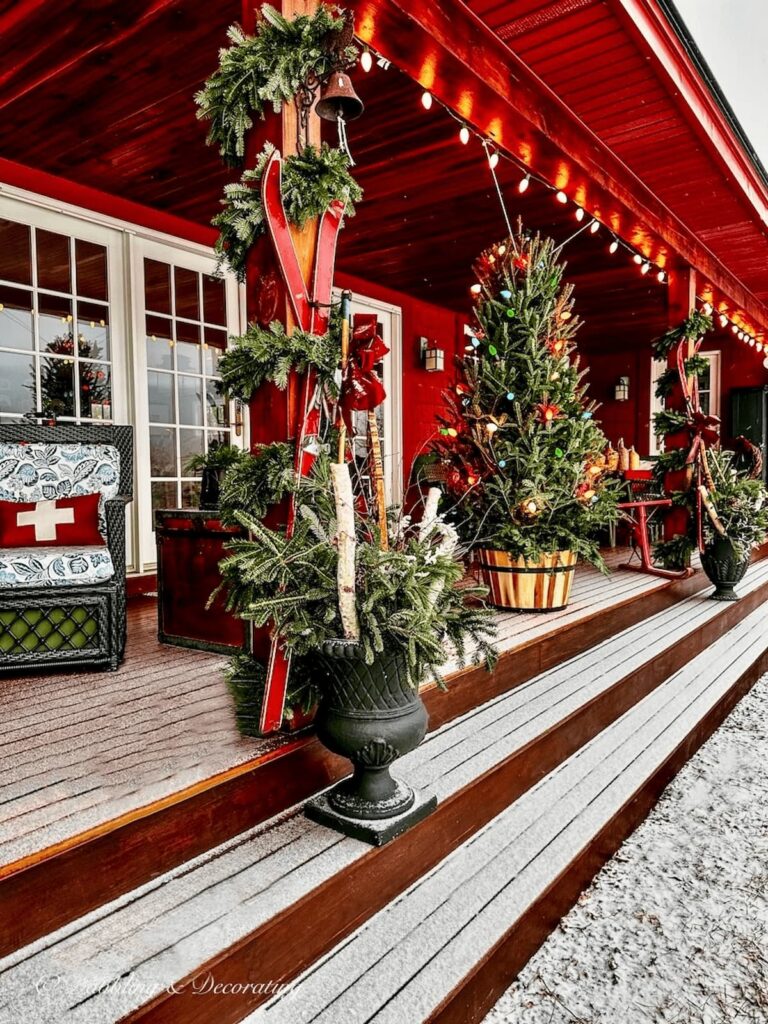
Vintage Skis and Evergreens
With an all-day snow forecast this past Thanksgiving, I began early decorating our front porch by wrapping each beam with 15-foot natural garlands.
Next, I added two pairs of vintage red skis, which I found at a yard sale this past summer.
Learn more about these yard sale red skis in this Red Decor Home Decorative Objects post.
And lastly, I filled these DIY urns with evergreens, white birch logs, pinecones, and natural twigs.
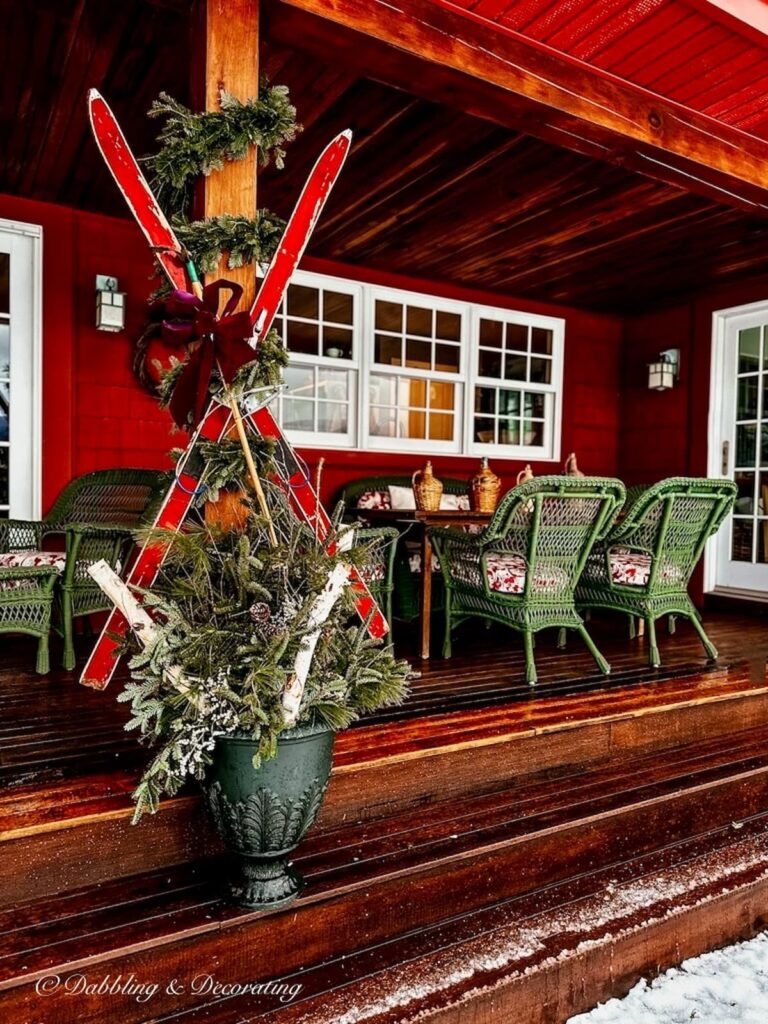
Pro Tip
To hang criss-crossed skis like these, I slipped each ski up under the garland and used floral wire to attach them to the garland and porch’s beam. I then added a burgundy bow to cover up the wire. The wire helps secure them for inclement weather that is sure to hit us here in Vermont
You may also find inspiration in this Holiday Preparations: Embracing Plaids and Tartans for Christmas post.
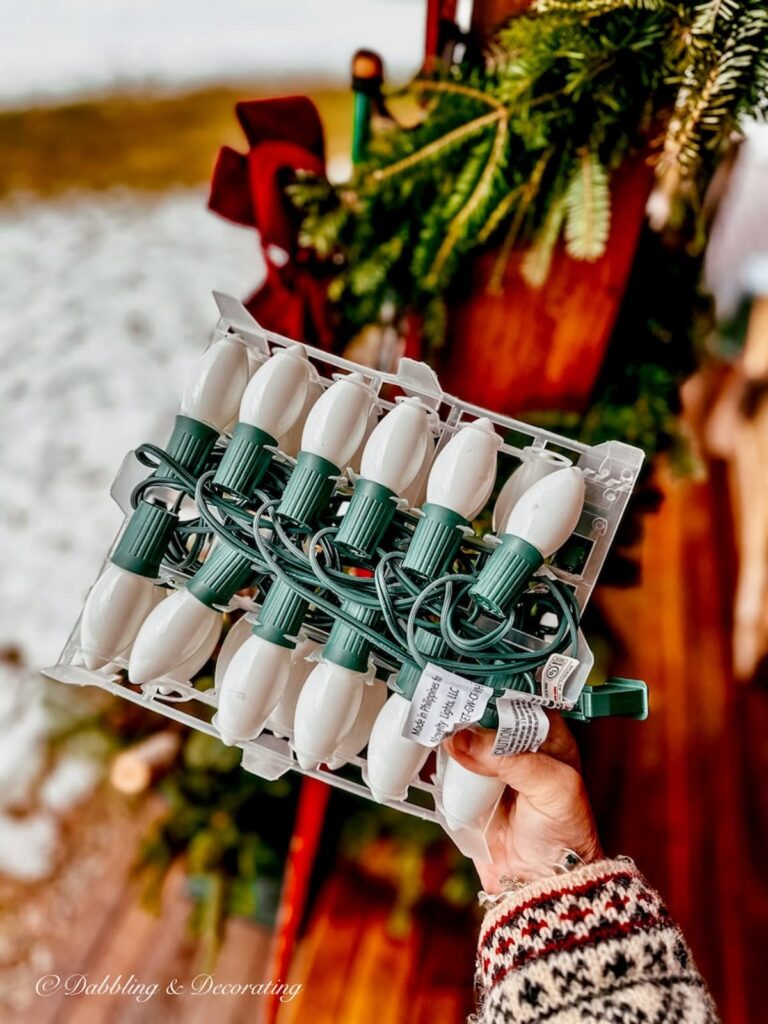
Vintage Christmas Lights
To complete our front porch’s vintage Christmas aesthetic, we’ve added a touch of old-world charm with large white bulb light strands.
These Christmas lights add a stunning focal point that illuminates the surrounding mountain views.
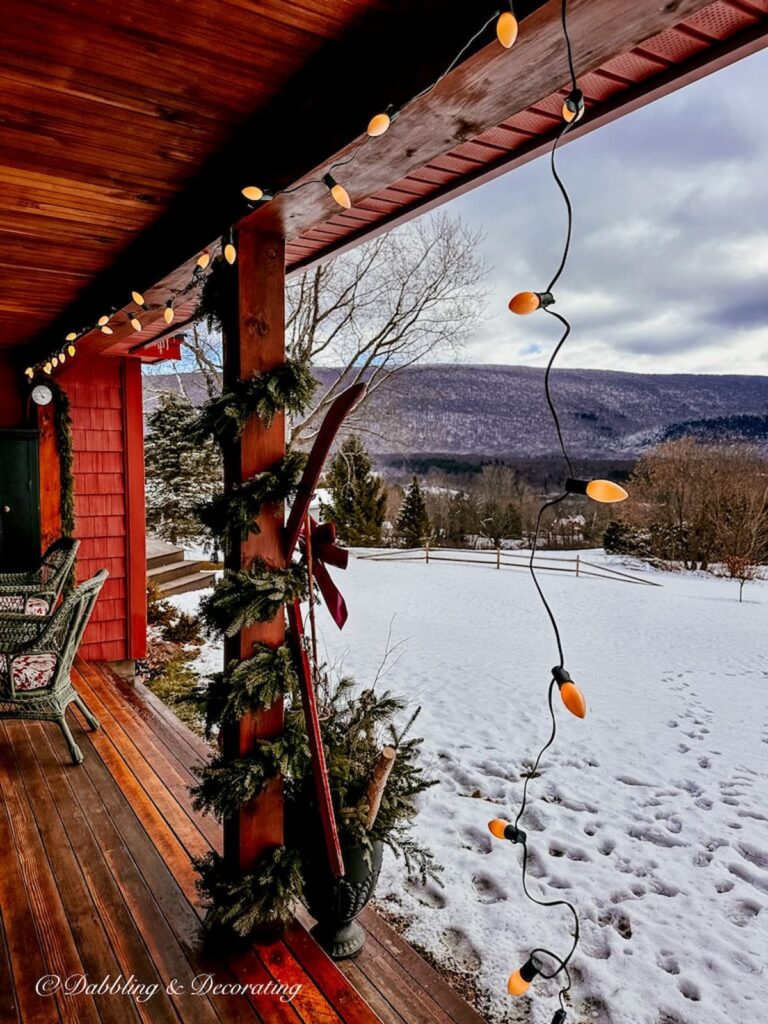
Our front porch is about 50 feet long, so we only needed two strands of these 25 ft old-school vintage lights. We placed hooks throughout the top beam, rested the strands into the hooks, and lit them up with an extension cord connected to an outdoor light socket.
Pro Tip
These strands of Christmas lights have many color options. For your information, I chose the white opaque ones, which are a warm yellow light, not bright white as you may think. I actually prefer the warmer white lights as they give off more of a vintage Christmas ambiance.
Pro Tip
You may also find inspiration in this Ice Lantern Kit: Deluxe DIY Winter Globe Luminaries post.
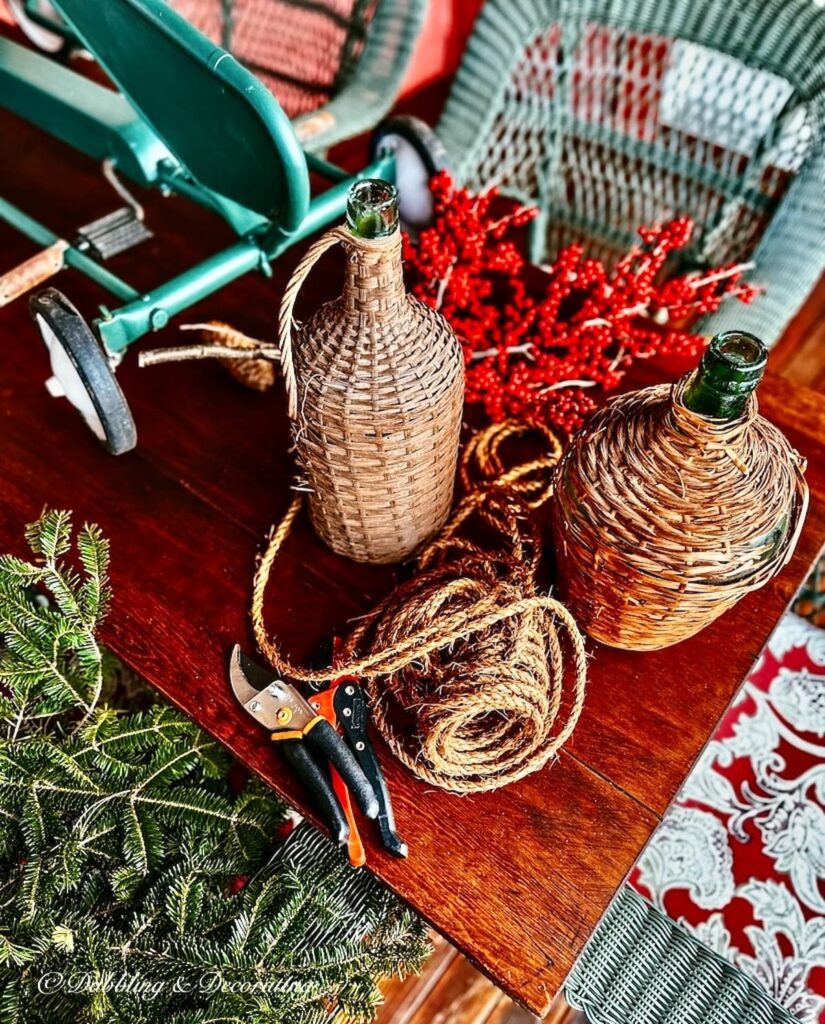
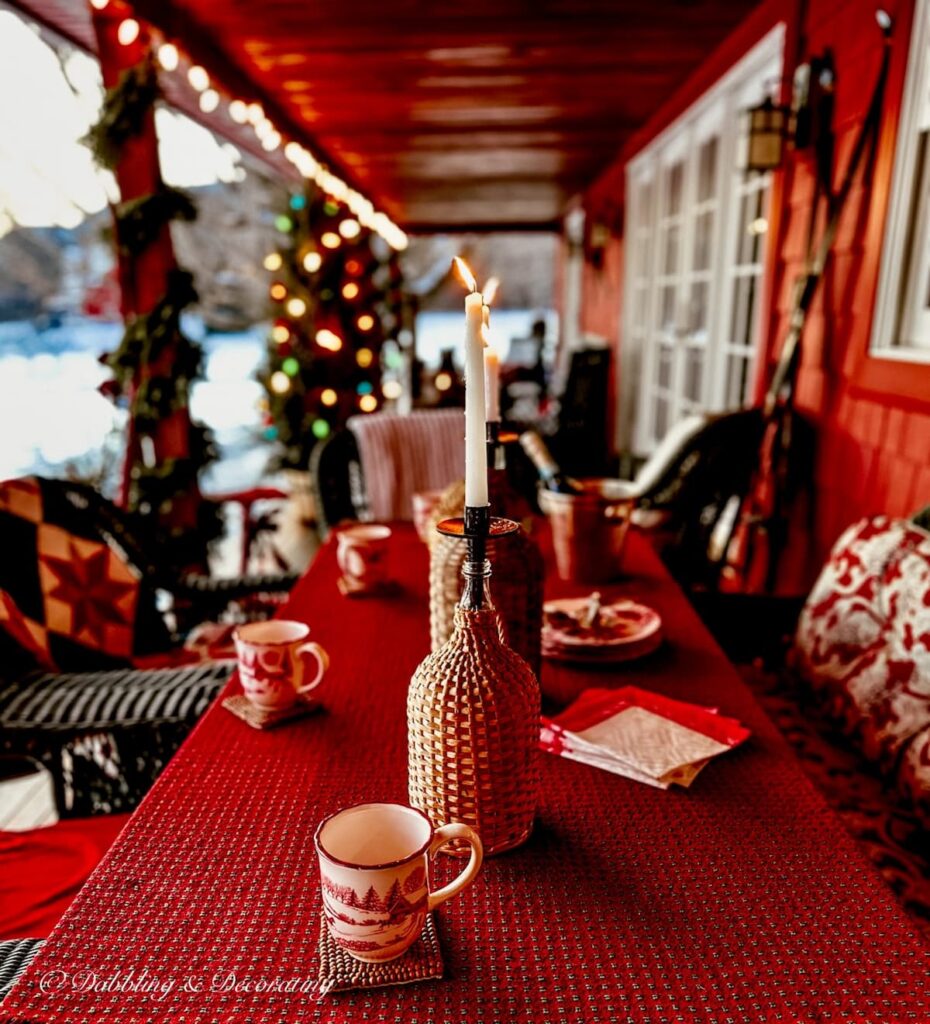
Mountain Weaver Tablecloth
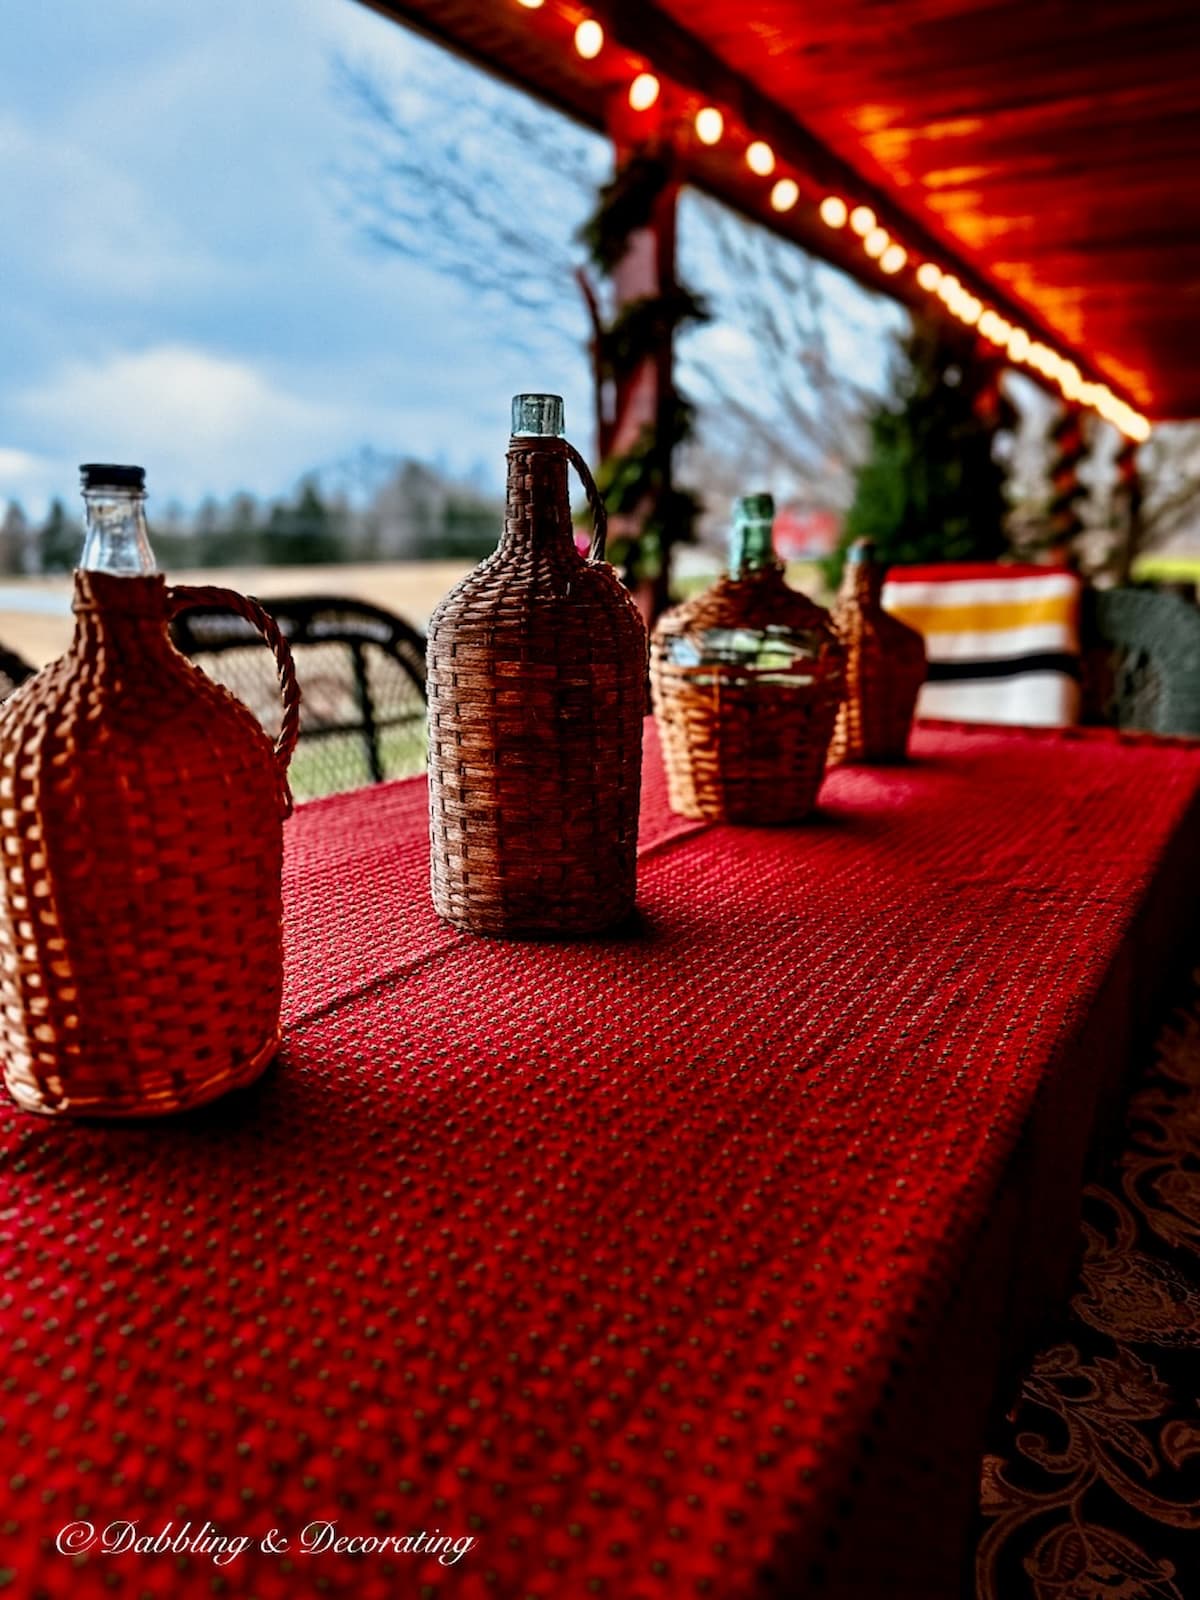
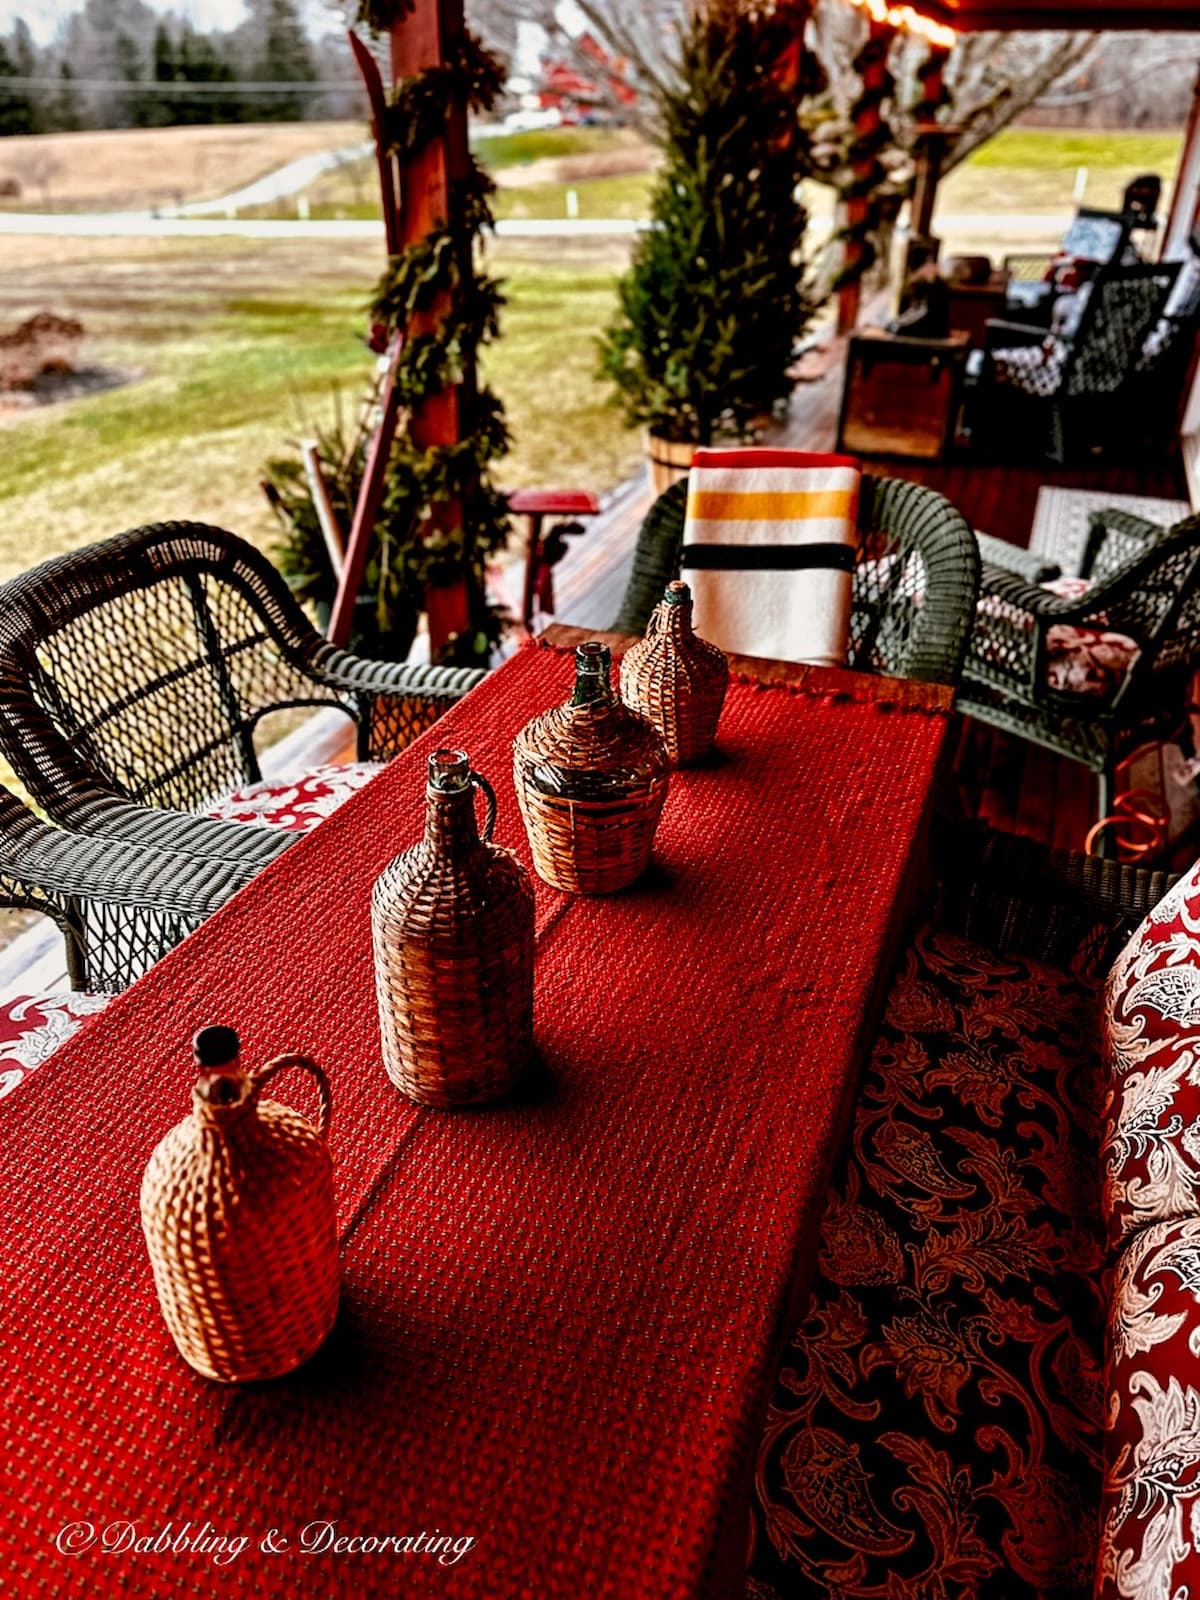
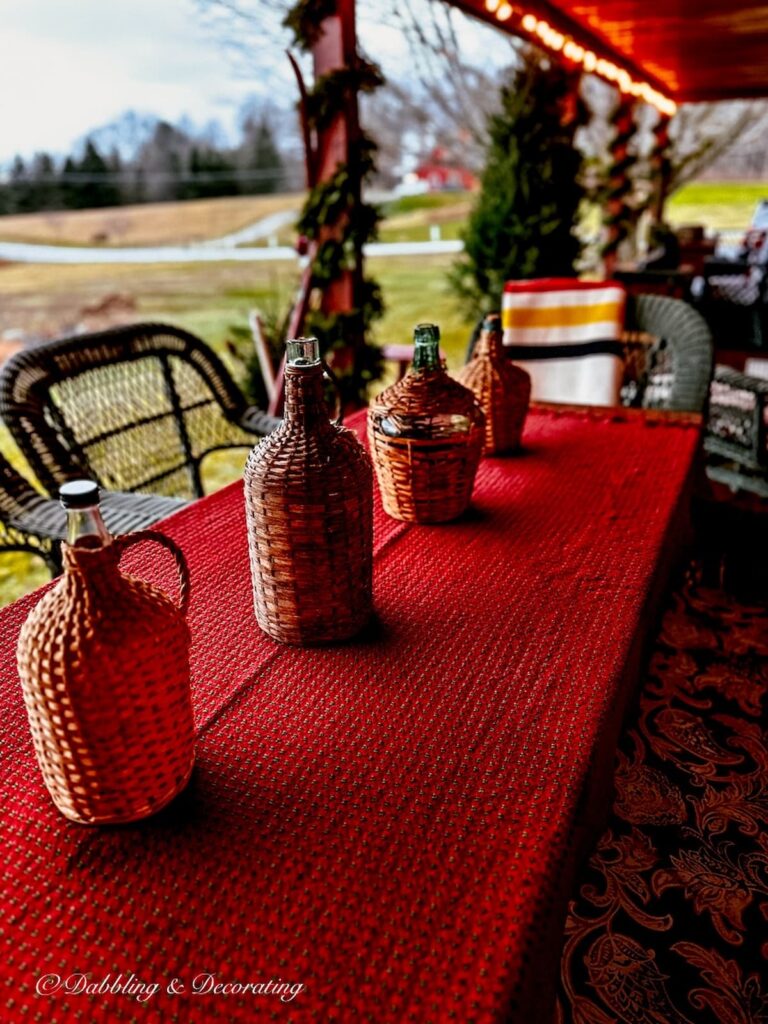
To add a bit more cozy and color to our porch’s vintage wallpaper table, I added my favorite Mountain Weaver red tablecloth from The Vermont Country Store.
Lined with a collection of vintage demijohns and topped off with a classic winter Pendleton wool blanket.
Porch Christmas Tree
And lastly, on the porch, we added this live Christmas tree with vintage-colored lights, similar to the vintage white lights we added to the porch trim above.
The tree rests inside an old whiskey barrel that we’ll allow to weather, giving it that rustic vintage vibe for future holidays.
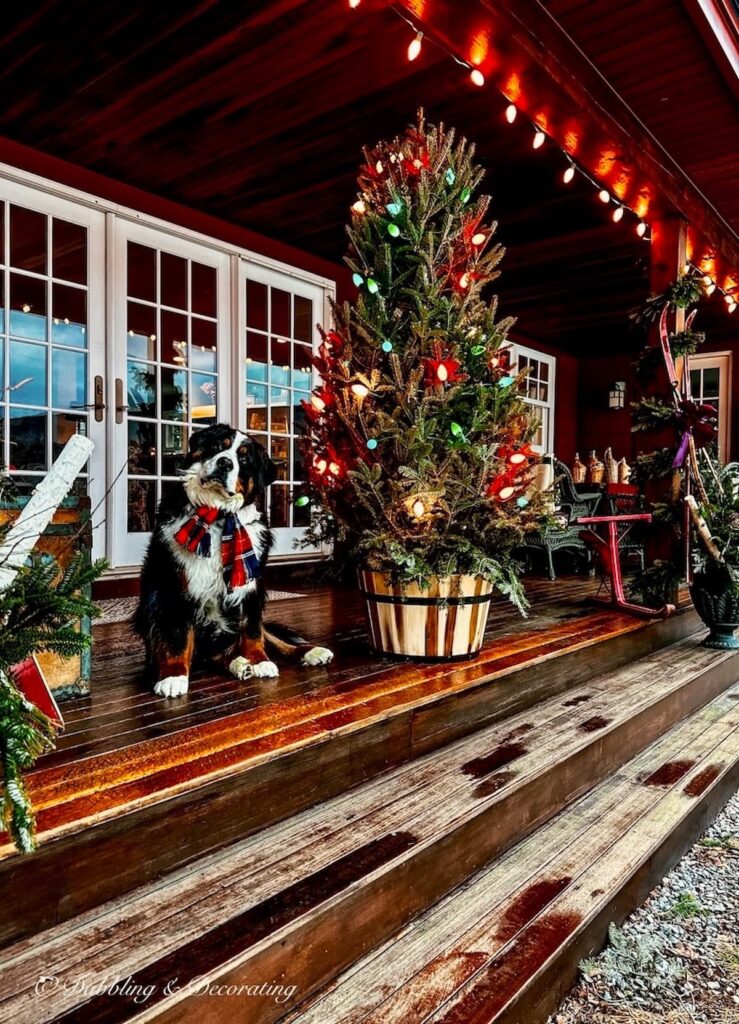
And a little snow makes everything look a little prettier…
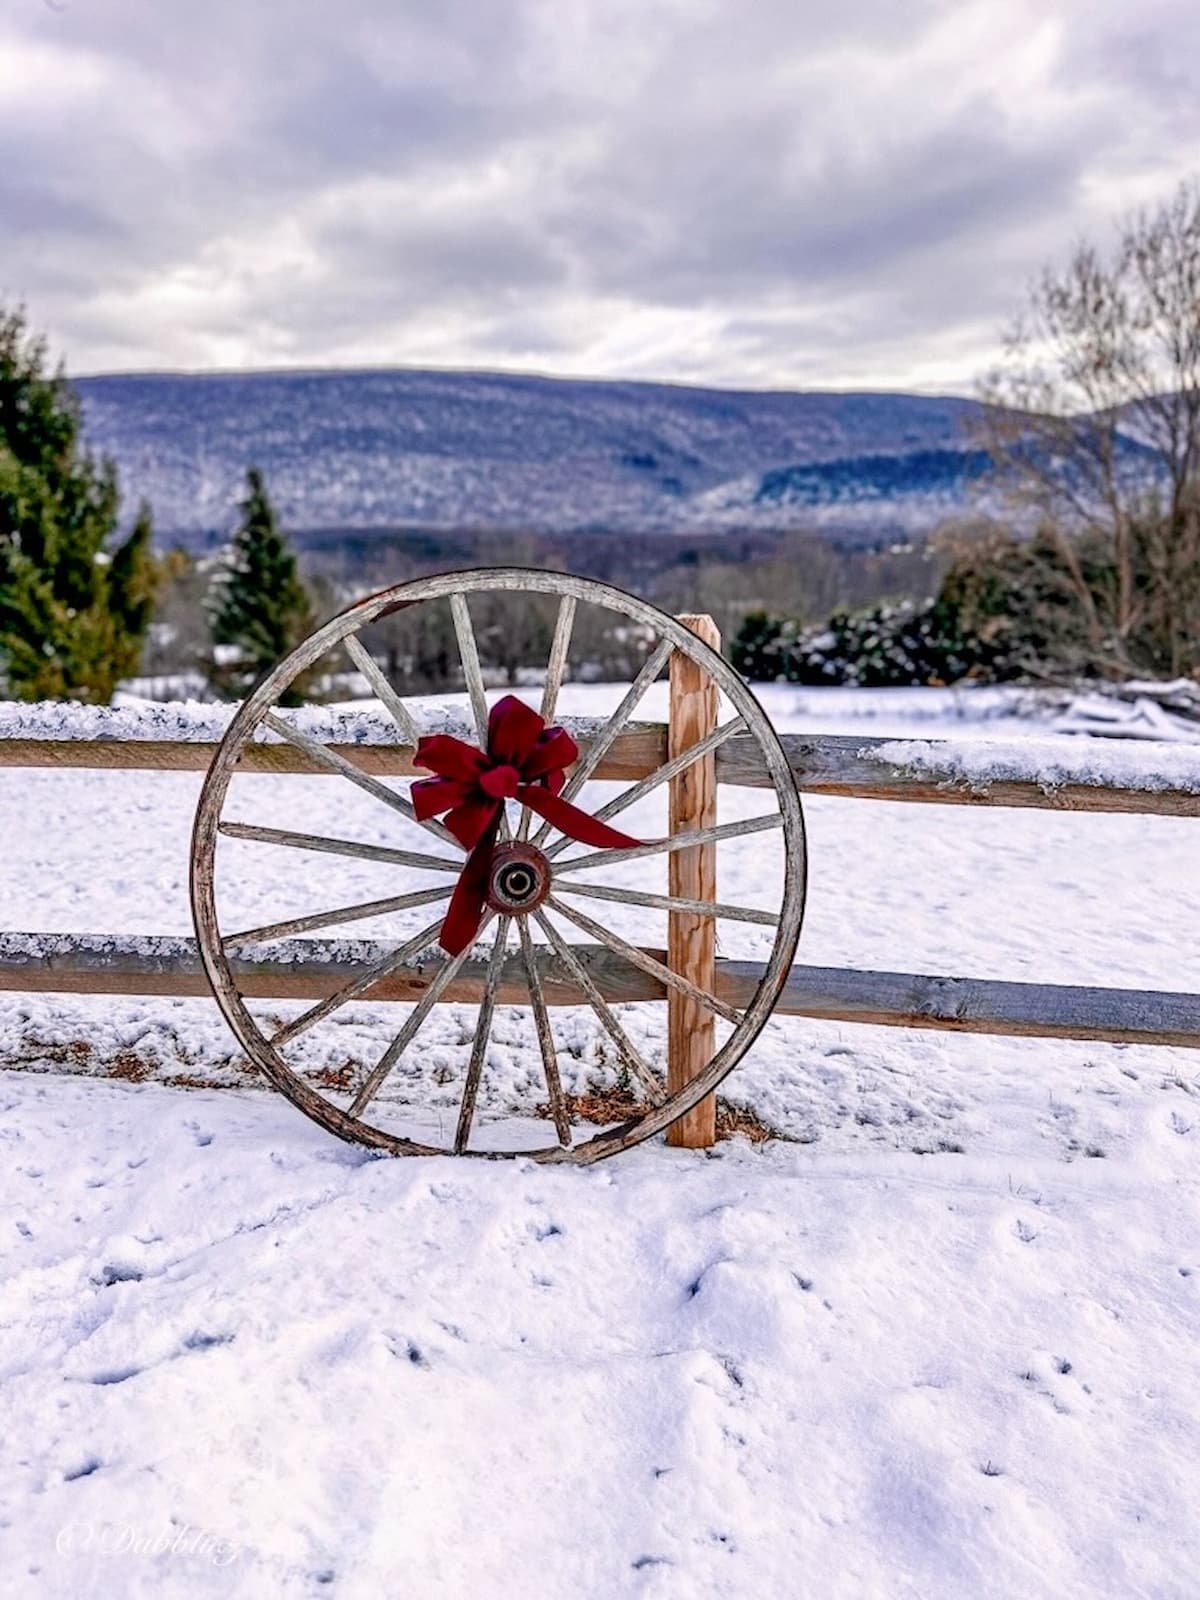
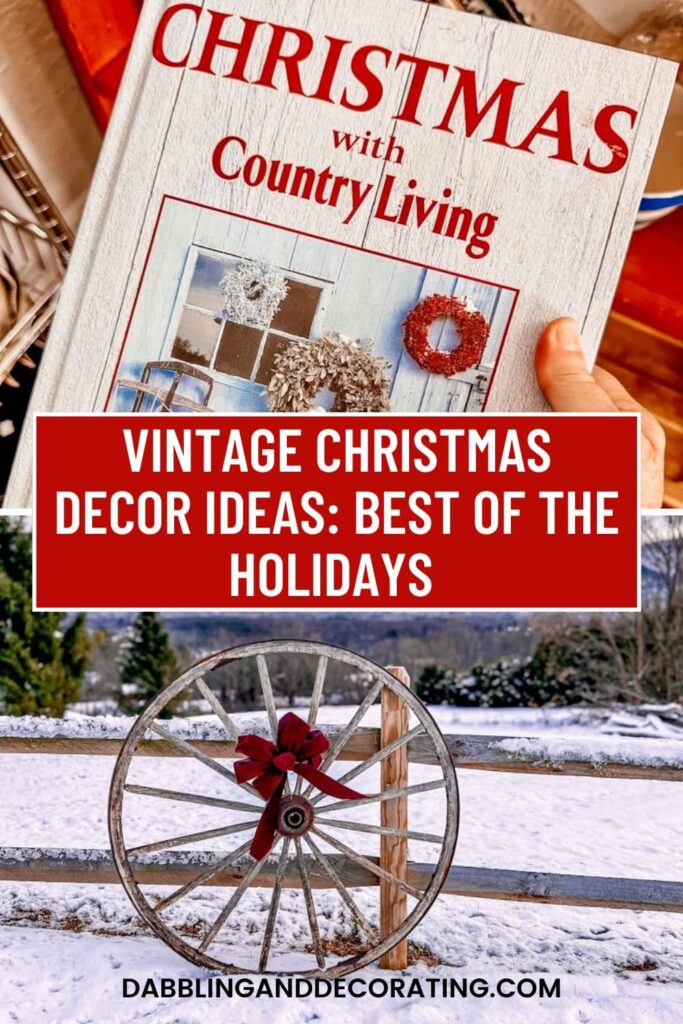
Vintage Christmas Wagon Wheel
What’s more classic in winter than an old wagon wheel?
This vintage wagon wheel was left to us by the previous owners of our Vermont home.
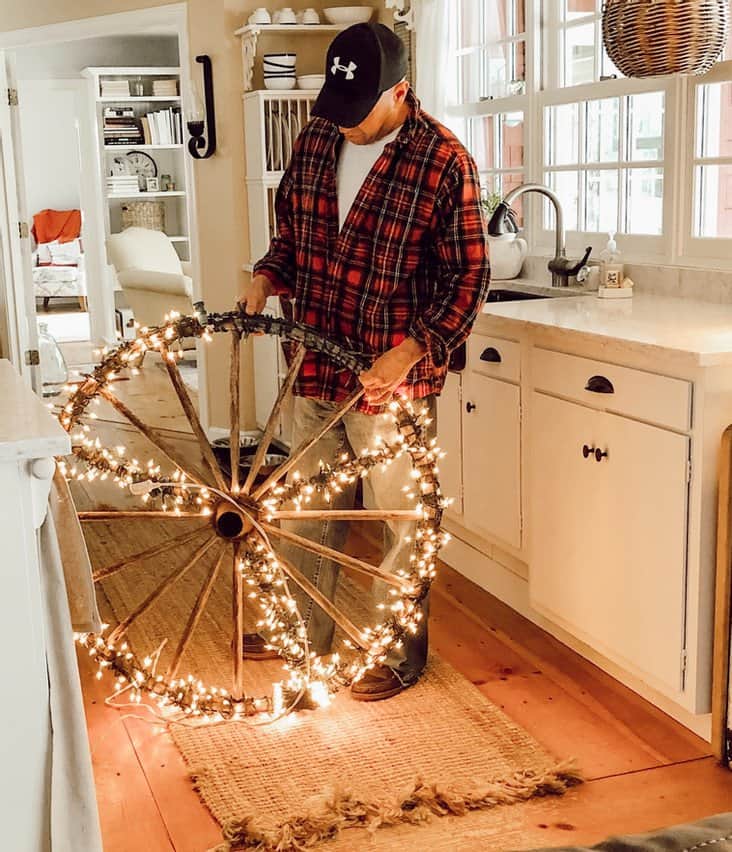
DIY Christmas Wagon Wheel with White Lights
In the past, I have had white lights tightly wrapped around this wooden wagon wheel, symbolizing a peace sign during the holidays. See more in this DIY Christmas Wagon Wheel with White Lights post. (One of my very first blog posts ever, yikes!)
But it was time to try something different.
This year, I added a simple burgundy bow to match the ones on our vintage red skis and front door snowshoes and leaned it against our split rail fence.
I love the depth it adds to our mountain views. Its style is also so classic New England.

Swiss Nordic Alpine Theme
Living in Vermont, I am very drawn to the vintage ski lodge decor style, which includes vintage finds like old skis, skates, sleds, snowshoes, etc, so much so that I created an entire blog series around it.
This year, I’ll add our newest theme to this series, Nordic Alpine | Swiss Cross, to our holiday and winter decor. So be sure to sign up here for all the newest Christmas trimmings coming soon.
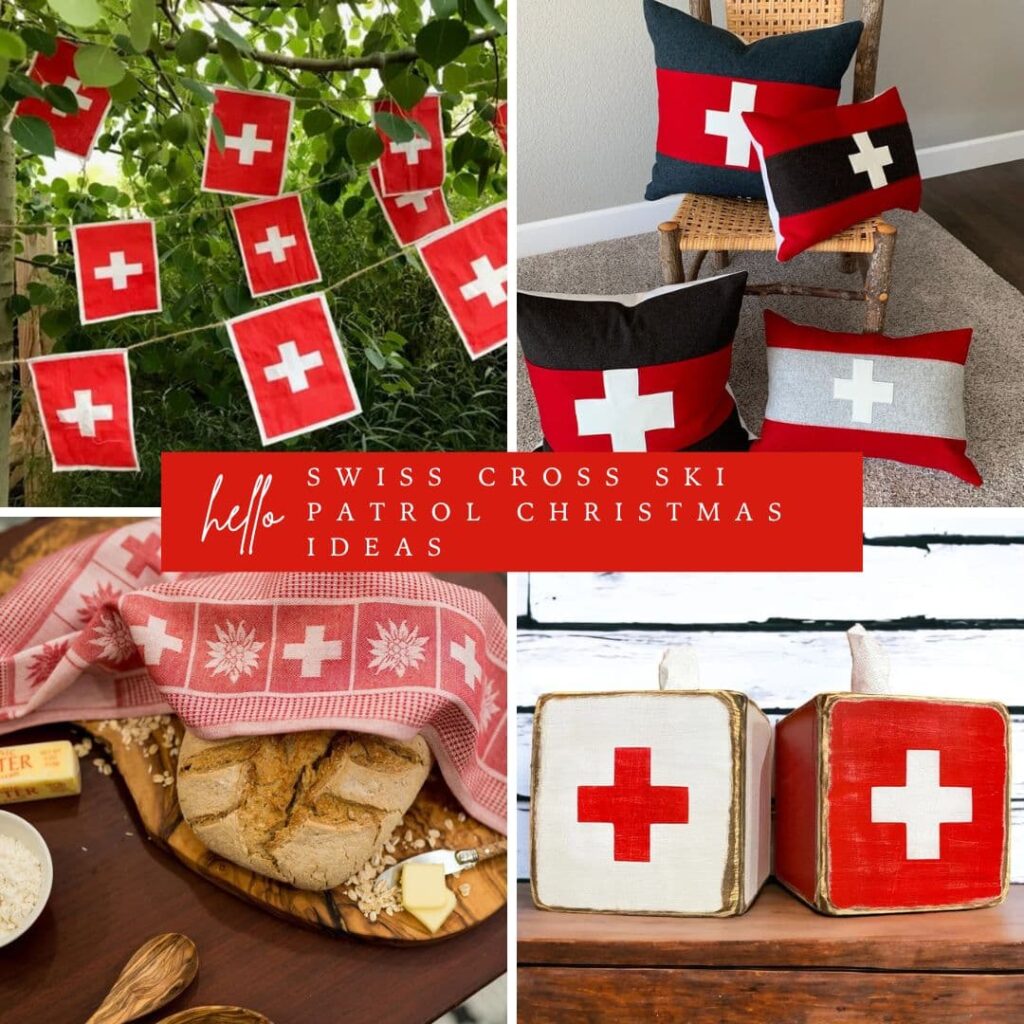
The Swiss Cross’s Significance
The Swiss Cross, as depicted on the Swiss flag, holds significant historical and cultural meaning. It features a white cross on a red background, symbolizing neutrality, peace, and protection. This design traces its origins to the medieval coat of arms of the Swiss Confederation.
The Swiss Cross has been widely adopted internationally as a symbol of aid, rescue, and reliability. For example:
The Swiss Cross’s association with trust, excellence, and service has made it a global symbol of dependability and care, and that is why I am adopting it as our vintage Christmas decor theme this year.
Pro Tip
You may find inspiration in this The Finest Winter Wonderland Dinnerware Set post.
Christmas Wrapping Paper
Staying with our newly adopted vintage Nordic Alpine theme, I purchased this wrapping paper and ribbon to display the gifts under our Christmas tree.
I love the added pinecones and cinnamon sticks, too!

This post may contain affiliate links, which won’t change your price but will share some commission.
In conclusion…
As you’ve seen, vintage Christmas decor can bring a touch of nostalgia and elegance to your holiday celebrations.
You can create a truly unique and personalized holiday display by incorporating vintage ornaments, vintage Christmas lights, and other antique finds.
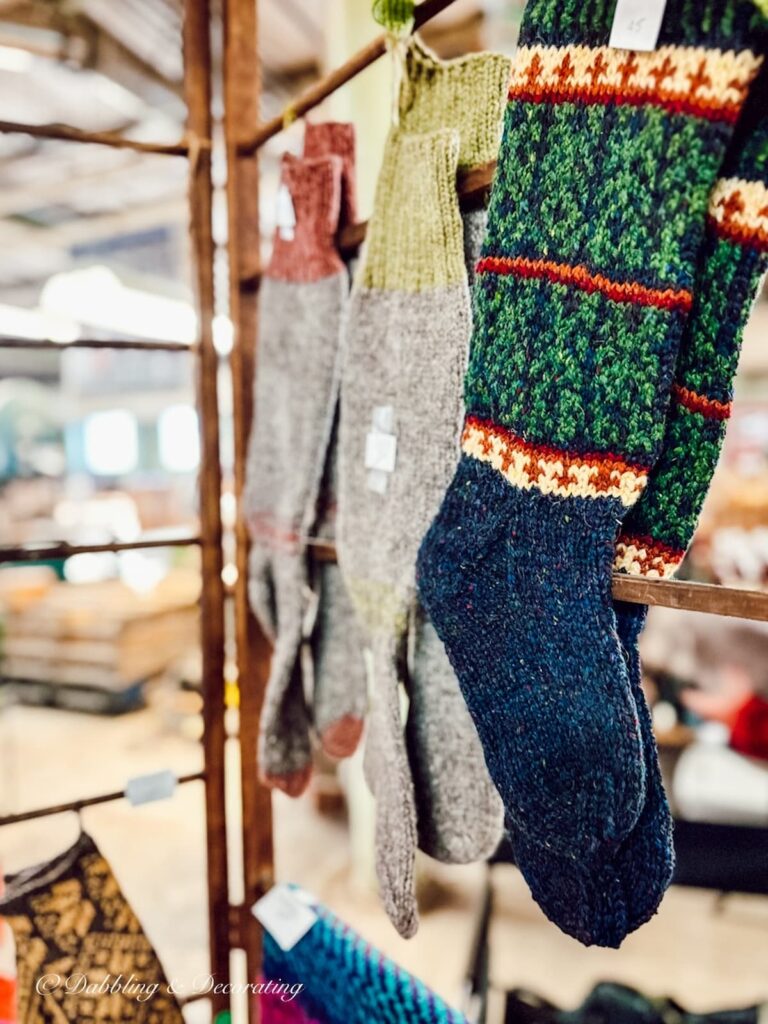
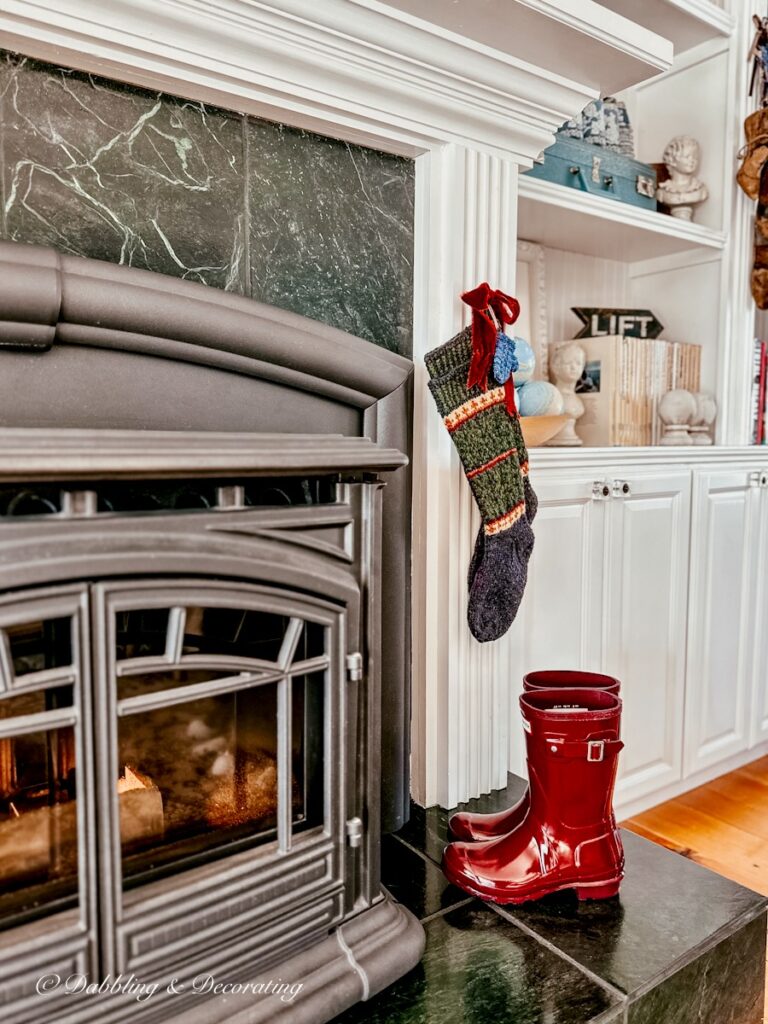
Hand-made items like this pair of knit stockings I found at a Christmas Farmer’s Market make incredible Christmas decorations, too. This pair I hung on our fireplace with a burgundy bow. And after the holidays, they will serve as functional winter stockings!
Whether you source your decorations from local antique stores or online marketplaces, remember to add a modern twist to keep your space fresh and contemporary. So, embrace the past and present this holiday season, and let your vintage Christmas decor shine!
Your Guide to Embracing Eclectic Style, Vintage Finds, and Thrifted Home Inspiration~
Love decorating with vintage finds, thrifted treasures, and eclectic charm? I’d love to hear from you! Leave a comment below, share this post with a vintage-loving friend, or join our Reader’s Showcase Series — where we feature your favorite thrifted and antique finds. Email me at [email protected] to be part of it!
Pin forLater!

Shop This Post
This post may contain affiliate links, which won’t change your price but will share some commission.
Next up on today’s Christmas home tours is Wendy of WM Design House, who is sharing her Blue and White Christmas Decor. Wendy is so creative; if you love blue, don’t miss her post; her ideas are stunning!
Lovely post. I am happy I found your blog!
https://jeanneselep.blogspot.com/2023/08/collection-china-hutches-and-china.html
Thank you so much, glad to have you here!
Everything is so beautiful! I always love seeing your home and how you have lovingly brought back it’s charm, especially during the holidays. Of course I love all of your vintage finds and Christmas treasures! I am also forcing paperwhites in little transferware dishes. So fun!
I vote year 6 on the wreaths! Did the door color change? The ribbon just seemed to pop more.
Everything looks beautiful, especially the view!
Merry Christmas!
Thanks so much Amber. The door color hasn’t changed in the last few years, although it may have faded some. Thanks so much for stopping by and for your sweet comments. Happy Holidays!
Ann, I love the way you decorate! Your Christmas mannequin is a stunner…breathtaking with the pine branches skirt! Of course you live in the perfect place for Christmas, guaranteed to have snow! Your porch and decor is fabulous. I really enjoyed your tour and wish your family a JOY filled Christmas season!
Thank you so much Cindy, last year we were in shorts on the porch over Christmas… So having the snow now is a welcome relief, LOL. We love our snow around here. Thanks so much for your sweet comments and happy holidays Cindy!
Oh wow. You’ve decorated your parents’ home beautifully. There were so many great details that I couldn’t choose a favorite, but I loved seeing the sequence of the 3 wreaths over the years! Thanks for sharing your lovely home!
Niky
Thanks so much Niky, I appreciate you stopping by!
Thank you kindly Niky, so appreciate your sweet comments and for stopping by today!
Ann, I am in awe of your property and the views to the mountains!!! Jaw-dropping… It sure makes the wagon wheel, the crossed skis, and all the winter decor out on the porch fit in perfectly. I love your family’s three wreaths on the cabin’s front door. Fun tradition!! And I love the layers of china on the wooden rack’s shelves.
Have a happy Christmas with your family,
Barb 🙂
Thank you so much Barbara, so sweet of you to say and I’m so thrilled you found inspiration today. Happy Holidays my friend!
Thank you so much Barbara, I appreciate that so much. Happy holidays to you and yours too!
Ann, I had no idea that you could buy a wagon wheel online! Wish I had a place for one. I always love your vintage items and how you use them for holiday decorating. The story of the wreaths on your parents, front door is so sweet. What a nice tradition to carry on. Merry Christmas.
Thanks so much Carol! I’m so glad you enjoyed today’s post!
Yes, love weaving vintage finds throughout the Christmas decor, and it makes your home totally unique! Love those vintage red skis, Ann, and how you hung them on your porch posts. Perfect style with the gorgeous mountains in the background. Fun to see Christmas throughout your homes! Merry Christmas season!
Thanks so much Lora!
Well I think year 6 might be my fave door but it’s super hard to choose. And I love all of your berry stems tucked here and there. You have so many baskets that everything looks fantastic but I have to say, I adore the wagon wheel on the fence but what put your tour over the top was the skis on the porch post. Wowza! Thank you for joining us. pinned
Thanks so much Cindy, I’m so glad you enjoyed it all. Thanks so much for having me!
You have so many unique pieces and I love how you decorate with them. I think the 3 wreaths tradition is amazing! And I adore how your use winterberries throughout your decor! You are such a creative person and it shows in your beautiful home!
Missy, so sweet of you to say and thanks so much for your sweet note! Happy holidays!
Your winter berries and blue accents are so striking! I love the feeling of nostalgia while going through your all photos. Happy Christmas Ann, I enjoyed your beautiful tour!
Thanks so much Michelle, so nice seeing you again!
Amazing how you found the photo from your parent’s front door and then followed the tradition. Your home is so beautiful with those fabulous views. Your dress form is iconic with the garland skirt; do you have a tutorial on that? I have one, but haven’t used it for Christmas. so adorable!! Happy Christmas, Ann
Thanks so much Debra, yes I posted a link to the tutorial for the Christmas tree mannequin just before the photo. Isn’t she so cute, LOL. Happy holidays Debra!
Ann I loved learning about the three Christmas wreaths. Thank you for sharing this tradition. I am also inspired to add a wagon wheel to outdoor holiday decor!
Thank you so much Laura, they make for wonderful memories! Isn’t the wagon wheel so fun? So simple too! Happy Holidays!
Ann
Your tour is just amazing. You have so many wonderful finds and I love how you embrace the history of your home. Great job.
Ann, your vintage decor is absolutely gorgeous! Funny, I gave my dress form an evergreen skirt for the holidays, too–great minds think alike! 😉 Your Christmas porch decorations are so charming! Have a joyous Christmas season! Cecilia @ My Thrift Store Addiction
Thanks so much Cecilia, aren’t the mannequins so fun to decorate? Happy holidays to you and great hearing from you again!
Hi Ann,
I love this post. I especially love the three wreaths on your Maine front door, and the paper whites in the vintage stoneware. So many charming, vintage ideas! I love the lights on your VT home and of course who doesn’t love a pair of vintage skis and snowshoes. But I think my favorite of all is the mannequin. She makes me giggle. Like Ella.
Thanks as always for the inspiration!!
XO
Cara
Hi Cara, you’re so sweet as always. I’m glad you like the mannequin, I still need a name for her though! Happy Holidays!